15 Amazing Air-Dry Clay Ideas To Get Started
Air-dry clay is cheap, easy to use, and highly recommended for kids. In fact, it’s something you’d definitely spoil your kids with to let them put forth their creativity in the easiest way possible. And the best aspect of this traditional clay alternative is that even adults can give life to the cool decor ideas swirling in their minds. Although it’s rare, if you’re falling short of what to build with air-dry clay, I’ll help you out.
In this article, I’ve rounded up my top 15 air-dry clay craft ideas to keep your kids busy this weekend!
What Is Air-Dry Clay Best Used For?
Air-dry clay is the best alternative to conventional clay and is relatively easy to work with. It is extremely adaptable and dries without the usage of a kiln (an insulated chamber) or oven. Simply leave your artwork to dry at room temperature for 36-48 hours and it’s done! If you want to have your project dry faster I have a dedicated article with all the different methods here.
A vast range of clay-based items can be crafted out of air-dry clay without the use of any particular type of equipment. Some of the common things that I prefer to purchase air-dry clay for are art pots, planters, bowls, keychains, wall decor, pencil holders, and jewelry. Although the sky’s the limit to this list.
There are tons of other applications of air-dry clay that entirely depend on its type. Some of the basic air-dry clay types are:
- Paper-Based
- Earthen
- Epoxy Two-Part Mixed-Base
Coming to the main benefit of air-dry clay – is its durability. Even though there’s no need to set it in any hot chamber, it hardens on its own as it gets in touch with air. But one of its disadvantages is its durability.
However, air-dry clay is not as durable as the regular clay that’s fired in a kiln. Due to this, the latter is relatively stronger. To achieve the same level of strength as clay, it’s suggested to use wires to support your air-dry clay craftworks, especially larger sculptures.
Some interesting related articles here:
- How to harden modeling clay with and without baking
- How to make air-dry clay dry faster?
- How long to bake polymer clay?
Basic Steps/Tips To Use Air-Dry clay
Although there’s no rocket science behind using air-dry clay, I still suggest following these basic steps/tips to use air-dry clay as it should be. These steps/tips will make sure your creativity comes out as expected.
-
Prepare Your Work Surface
Whether it’s a small or quite big project, opt for a stable and smooth work surface. For example, I prefer to use a silicone craft mat, wax paper, or even a bunch of old newspapers. This will let you finish your project easily and without having it stick to your surface.
Pro tip: Wondering how to handle the stickiness? Since air-dry clay is very sticky, high chances are there of it getting stuck to your hands, surface, or the tools you’re using. As a remedy, rub a pea-sized quantity of any oil on your hands before starting to help minimize the stick.
-
Cover Your Project
If you’ve to leave the workspace for any reason in the middle, don’t forget to cover your artwork with a piece of paper towel or even a thin cloth to keep dust and other tiny particles present in the air from sticking to your project. There’s another reason why this is necessary.
Air-dry clay quickly dries up if left uncovered. Any sort of covering will keep your clay from drying out and will be ready when you come back to work on it.
-
Don’t Make Your Project Too Thin
When working on an idea, always make sure that your clay isn’t too thin. This is because it’ll increase the chances of cracks and quick drying. Keeping this in mind, make sure you do the project with a stable foundation and ensure an even thickness throughout.
-
Give Your Project A Smooth Finish
When sculpting your air-dry clay, it’s very common to have imperfections, whether you’re a beginner or a pro air-dry clay user. In such situations, what you can do is pick a small wet sponge or simply use your fingers to ease out those imperfections.
Important tip: Do not use too much water as it will increase the drying time or worse, spoil your artwork.
-
Carefully Sculpt Small Items
When making small or detailed items, you ought to be extra careful. For these items, you can use a 1:1 ratio of PVC glue and water to strengthen them. Why I’m stressing about a PVC glue and water blend over the simple glue and water mix is because the former will lower the chances of your model breaking or cracking.
-
Let The Clay Dry Out Properly
Once you’re done with shaping your artwork, let it get enough air exposure for an inside-out drying. If you’re using a mold, allow your clay to dry enough and then remove it for it to maintain its shape. Also, I recommend you flip your projects at regular intervals to speed up the drying process.
-
Color Your Air-Dry Clay (OPTIONAL)
(OPTIONAL) You can make your air-dry clay look more attractive by using food colors, high-quality acrylic paint, or any regular watercolor used in art and craft. To do so, add a few drops of the color to the clay and knead until you have the right color.
Alternatively, you can paint your project once it’s ready by using high-quality acrylic paint. Make sure to give it enough time to dry if applying more than one layer of paint.
-
Seal Your Project
As is the case with conventional clay, air-dry clay too isn’t water-resistant. Thus, even excessive moisture in the air can disturb your art piece. To avoid this, seal it with acrylic varnish or an air-dry glaze as it will protect your project from fading or chipping.
So, these were some quick tips and basic steps to handle air-dry clay. With enough knowledge gained, let’s put it to the test through the following amazing air-dry clay ideas.
Top 15 Air-Dry Clay Ideas You Shouldn’t Miss
If you want to do something innovative at home, here are some of the air-dry clay ideas to inspire you! From planters to bowls, from earrings to herb markers, you’ll find something that you’ll love! So, let’s start.
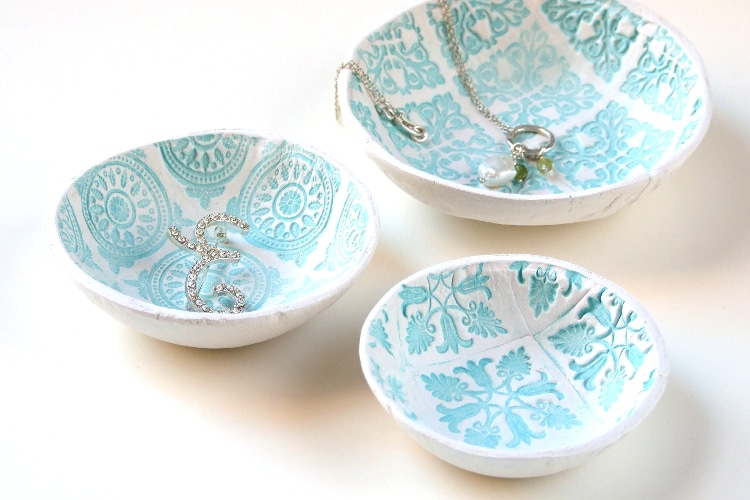
1. Stamped Air-Dry Clay Bowls
Do you love stamping air-dry clay bowls? If yes, why not use air-dry clay to make one? You can easily create stamped bowls like these in a few steps! They are absolutely simple and you can also customize the words to match them to suit your tone. However, these bowls are not food-safe.
2. DIY Air-Dry Clay Earrings
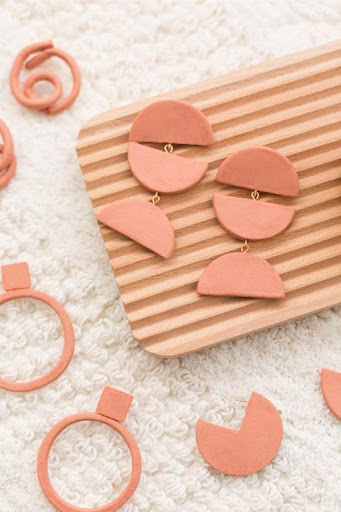
Do you like special handcrafted jewelry? I have to admit that there is something special about creating art. If you don’t want to pay a lot of money for handcrafted jewelry that is sold online, give this one a try. These air-dry clay earrings are easy to make and quite durable as well.
3. Leaf Clay Dish
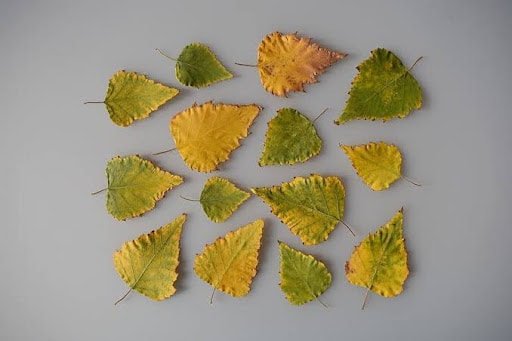
If you have been doing DIY products for quite some time, you would know that fall is an excellent season for making these leaves or any nature-related crafts. This leaf clay dish is the ideal project to begin the season with. It looks truly lovely and trendy and would be the best-handcrafted gift for your family or friends!
4. Decorated Clay Bowl
Use the coming holiday to make the most trendy and amazing bowls you have glimpsed. These decorated clay bowls with a flowered design are great for home decor. The best thing about these bowls is that there’s no baking or firing, and they are super easy to make. Isn’t that amazing?
5. Hanging Clay Planters
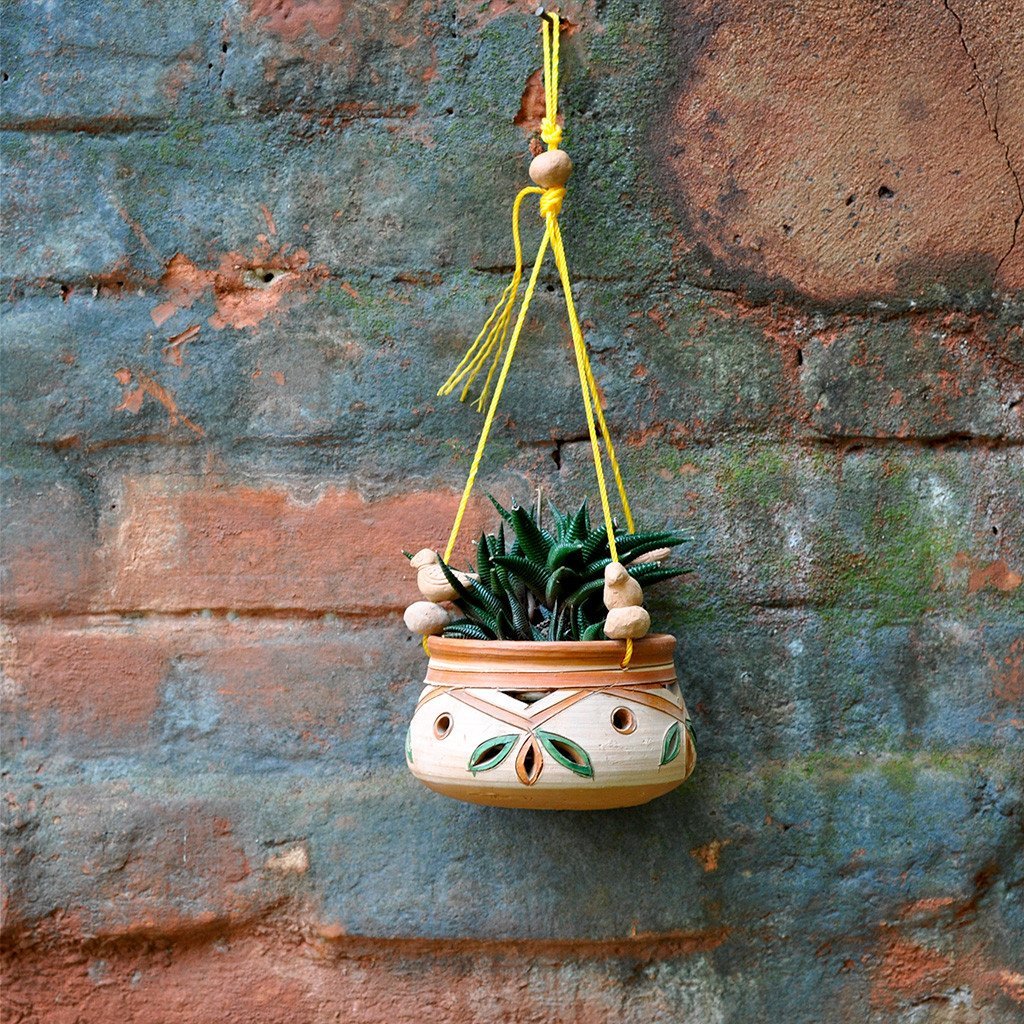
If you are looking for a feasible opinion to organize your untidy plants, then mounting them to the wall is the best idea. But how? These DIY air-dry clay wall planters are the answer for your unorganized small flowers and plants. Additionally, if hung in your living room, they work as excellent home decor! I love it!
6. DIY Herb Garden Markers
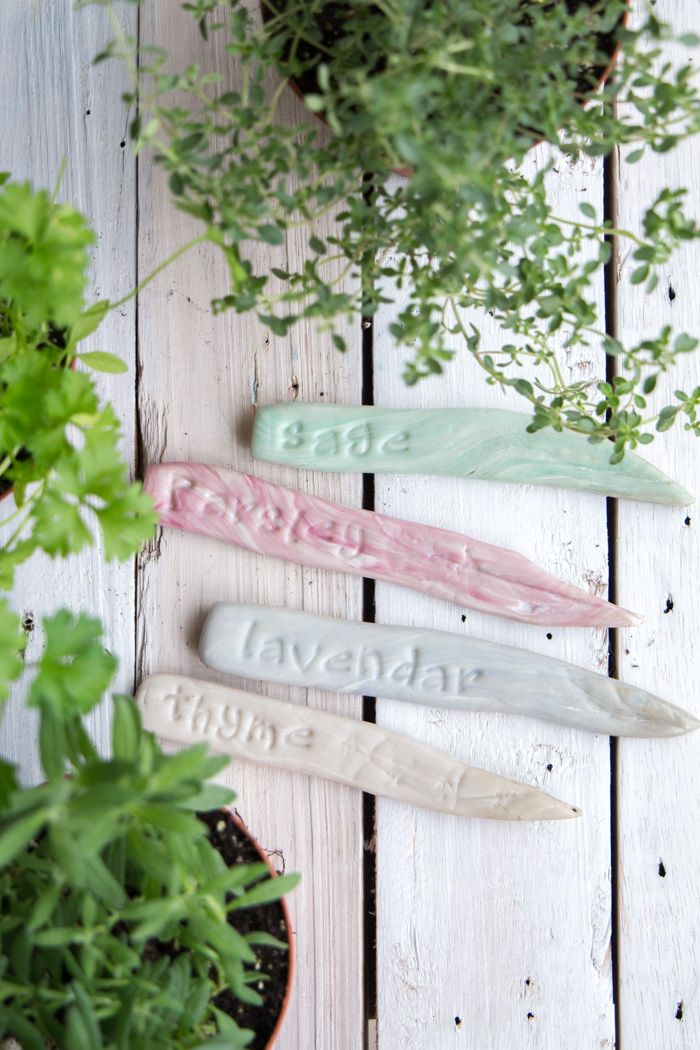
If you have got a mini herb garden at home like me and often get confused among them, organize your garden with these marbled garden tags that will enable you to recognize all your herbs on the fly!
7. Air-Dry Clay Home Hanging Decor
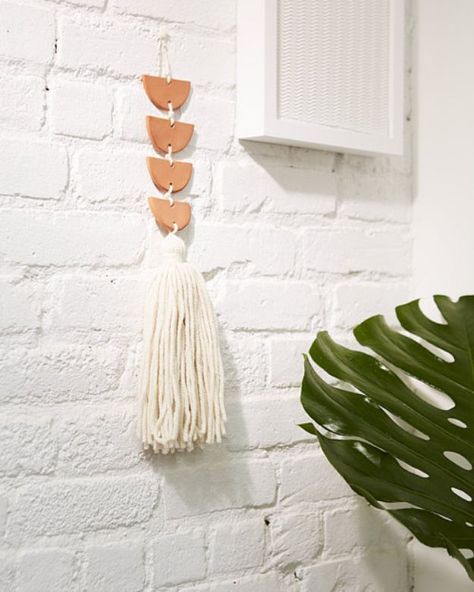
Looking for trendy and modern home decor? This DIY craft is the one for you! By using cornstarch and baking soda with air-dry clay, you can make this wonderful dangling decor with drips and rainbows. You can also work on it with your kids as it’s very easy and fun.
8. Fourth of July Tea Light Holders
Looking for a decoration that comes to life with the warm ray of a candle? You can make these easy lamp holders using air-dry clay and a few other decor items. They are very simple to make and they make an excellent decoration on your dining table!
9. DIY Air-Dry Clay Christmas Ornaments
Are you exhausted from looking for Christmas decorations each year? If that is the case, you can make awesome air-dry clay Christmas decorations at home without burning your pocket. All you require is air-dry clay, a couple of cutters that are set in various shapes, stamps, and a few other items. I love the way these have turned out!
10. Miniature Food Fridge Magnets
Whether you are looking for a pretty present or want to decorate your boring fridge, these miniature food fridge magnets are such a wonderful idea. They’re very simple to make and all you require is air-dry clay, acrylic colors, flowers, magnets, and other supplies.
11. DIY Textured Air-Dry Clay Pots
Love those trendy textured air dry clay pots you’ve seen online? They are fashionable and adorning, but they cost a lot. I have a trick. You can create yours at home without spending a fortune on those planters. The best thing is that you don’t have to fire this clay in the kiln. Let it dry and your favorite planters will be ready!
12. Air-Dry Clay Rainbow Craft
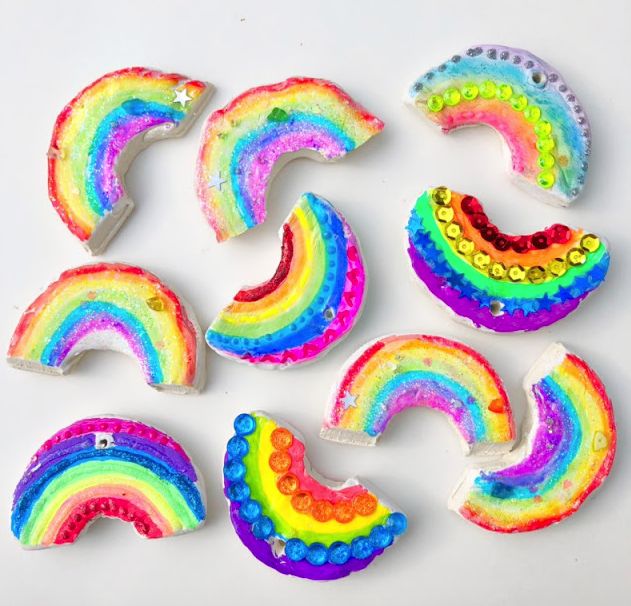
Love rainbows? You don’t have to wait for the rain to see it. You can make your little rainbows at home now. These little pretty rainbow decorations are made from air-dry clay and paint. Let them dangle on the wall or down from the roof (if possible), and enjoy the view!
13. Embossed Clay Star Craft For Kids
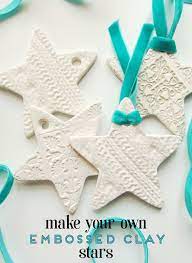
We all know that Christmas is all about love, gifts, and family. But, it’s also about decorating the Christmas tree and your home. If you like these amazing Christmas decorations, these embossed air-dry clay stars decors are an excellent option!
14. DIY Air-Dry Clay Multi-Purpose Container
Do you already have enough flowers and plants? Do you still want to add more to your collection but don’t have sufficient space? Then, this is the right chance to make two or more planters using air-dry clay! You will love this project because it creates something super useful while being very simple to do. Watch this video tutorial for more details.
15. Sea Shell Creatures With Clay
Are you curious about exploring sea life? Maybe you have watched Finding Nemo and now, you want to build your aquarium. You can also teach your children by making these sea creatures using air-dry clay. Each of them can make their favorite sea animal and have a lot of fun while doing it.
Q&A
What are the differences between polymer clay and air-dry clay?
Polymer clay and air-dry clay are two different types of clay that are often used by crafters and artists. While each type of clay has its own unique characteristics and uses, there are some key differences between them that can help you determine which one is best for your project.
One major difference between polymer clay and air-dry clay is the fact that polymer clay needs to be baked in order to harden, while air-dry clay dries naturally over time. This means that polymer clay offers a stronger, more durable final product than air-dry clay, but it also means that you will need to allow more time for your project to dry when using this type of material.
Another major difference between these two types of clay is that polymer clay is typically available in a wider range of colors, while air-dry clay tends to come in only a few basic shades. This means that you may need to use additional materials or techniques to achieve the color effects you are looking for when working with air-dry clay.
Overall, both polymer clay and air-dry clay can be used to create beautiful projects and sculptures. However, if you are looking for a material that offers great strength and durability, then polymer clay is likely the best choice for your needs. If you prefer to work with a wide range of vibrant colors, then you may want to opt for air-dry clay instead. Whichever type of clay you choose, be sure to take the time to research the proper techniques and safety precautions for working with these
Conclusion
So, here you go. As you have seen, there are limitless crafts that you can create with air-dry clay. Air-dry clay is such a beautiful craftwork material, it’s affordable, easy to work with, and doesn’t require any unique skills or any particular tool to get started.
We hope some of the above ideas will inspire you, and you will try to create amazing products with air-dry clay. Have more interesting ideas based on air-dry clay? Drop them in the comments below.
The post 15 Amazing Air-Dry Clay Ideas To Get Started appeared first on Art & Craft, DIY ideas and Tutorials - Craftbuds.