Eating Acorns: From Foraging To Cooking & Recipes
The first summer my family and I moved to our homestead, we were not able to get a garden into the rocky, wild ground, but somehow we had a fantastic fall harvest and started accumulating jars of dry goods from the plenty. How was this possible? One surprising word… acorns.
Watch the video:
Pretty much everyone can identify an acorn, even if they don’t know that it is the seed of an oak tree. You can see them used in fall decorations, pillow cover motifs, jewelry and crafts. Kids at summer camp use the caps for whistles, and landscapers roll their eyes in frustration every fall as bucket loads of nuts rain down onto their manicured lawns. But for all their ubiquity, the fact that acorns are nutritious and edible is a fact that is almost completely absent from our modern Western culture. When you consider the literal tons of free food that are falling on city streets, country lots, backyards, and sidewalks every fall, this fact should give anyone interested in sustainable food great pause!
For the forager, the acorn is a symbol of great hope. When every oak tree from the deep forest to the city park starts to light up in your mind as a source of food, the world looks different. It may seem odd to suggest that acorns should become an important part of our diets, but that is only because many of us are ignorant to the fact that our ancestors once subsisted, in part, on this widely-available nut. And we still can. So when you forage for acorns and turn them into food for your table, you’re participating in a gastronomic revival of ancient ways, blowing the dust off of something that hundreds of thousands of people once knew.
For this article, I’ll be explaining my own method for processing acorns into usable, delicious food. I live on an off-grid homestead, so I’ve figured out how to do all these steps manually, without the use of electricity, and with multiple opportunities for mid-process, stable storage (because let’s be honest, sometimes life is full of interruptions!). I say that so that you know that, though it takes a bit of time, an interested and motivated person can totally do this process without fancy equipment! You have what it takes.
With all that said, let’s learn more about how to turn the amazing, free bounty that falls every autumn into a dependable and delicious food for you and your family.
Acorns Have A History
The idea of using acorns as an important part of the diet is nothing new or even really all that adventurous. It’s just something that has been largely forgotten, I think.
Acorns as a sustainable starchy staple
When I first began seriously foraging, acorns became a huge focus for me. More than just a “trail-side nibble,” the acorn has been used as a staple food by several cultures, providing an easy to store, starchy basis to a diet. You can find acorns as an important part of the gastronomic lexicon of many different countries across the world, from Spain, to Italy, to North Africa, to Korea. There, you can find acorns roasted, pressed into acorn oil, brewed into acorn drinks, and even cooked into a tofu-like acorn “jelly.”
 𝗪𝗶𝘁𝗰𝗵 | 𝗦𝘂𝘀𝗮𝗻 𝗜𝗹𝗸𝗮 𝗧𝘂𝘁𝘁𝗹𝗲 (@whisper_in_the_wood)
On our own side of the ocean, they were a vital foodstuff to several Native American nations. Indigenous people used acorns wherever they grew, from coast to coast, but particularly those of Northern California such as the Hupa, Karok, Miwok, Pomo, and Yurok. They used acorns as an absolutely crucial part of the diet. Here’s where it gets interesting to those concerned with self-sufficiency. You are probably aware that the majority of food cultures are centralized around a starchy staple crop, whether it be corn, rice, potatoes, millet, wheat or what have you. In order for a people to depend on those staples, however, they must live an agricultural lifestyle. Those northern Native Californian communities were unique in that they were able to maintain non-agricultural lives because acorns filled that starchy staple need for the price of collecting and processing them, rather than dedicating the year to cultivating them in one specific spot.
Now, I am not hypocritically advocating against agriculture, of course! But, I hope it helps you realize the potential of having a bountiful, nourishing harvest from trees that you neither need to plant nor tend. This food requires no input but what comes to it naturally in sun and rain, so it’s certainly a super-sustainable source of sustenance (say that five times fast). If you’re a homestead seeking self-sufficiency someday, acorns give you a opportunity to draw a significant source of nutrition from the land, adding stable diversity to your homegrown food portfolio. And even if you don’t have acres and acres of land, you can still easily glean acorns that no one else wants to gain more control over your own diet resources.
If more people saw the acorns that rain on the sidewalk every fall as a gift, rather than an ankle-turning annoyance, could you imagine the impact? What if we also opened our diets to long-term perennial food crops that are largely self-maintaining and can happily grow in areas unsuitable to large-scale cultivation, rather than having our food security depend solely on huge, industrialized swathes of annual food crops that are outside of our control? It’s food for thought, certainly. Much more than a craft item or decorative motif, acorns may be one of America’s most underutilized food resources.
So all that said, I think that the ubiquity of the oak tree in the American landscape makes the acorn one of the most vital wild foods to learn if you’re an interested forager. Most other foods we’re going to learn about are building blocks of a diet–but acorns are the only one I’ve found that has the potential to be a viable foundation. So let’s get into the basics of turning this nut into dinner!
Part One: Foraging For The Plentiful Harvest
I got started on this journey by reading foraging books by Samuel Thayer.
Related Post: How To Make A Healing Salve From Backyard “Weeds”
The Forager’s Harvest, Nature’s Garden, and Incredible Wild Edibles are indispensable when it comes to truly learning about the practical aspects of gathering nutrition from the wild.
Thayer doesn’t just research the plants he talks about – he eats them every day and writes with the same sort of real understanding. One of his most beloved wild edibles is acorns, and anyone who reads his write-up will surely to want to give them a try as soon as they can!
Identifying Acorns
When I talk to people just beginning foraging, they share, without fail, their fear of misidentifying a plant and poisoning themselves. It’s an understandable, yet overinflated fear that has stopped many people from attempting foraging in the first place. Because while there are a handful of plants that are dangerous, the truth is, there’s far more harmless or useful plants out there. And in terms of harvesting acorns, the pickings couldn’t be more friendly– there’s no dangerous look-alikes. They are the only tree nut in North America with that distinctive cap covering the top. Basally, if it looks like an acorn, it’s an acorn. The only thing I could imagine a foraging newbie misidentifying is perhaps mistaking a hulled wild hazelnut for a capless acorn, but since hazelnuts are a deliciously edible nut as well, it’s obviously no threat!
Each of the dozens of species of oak trees produce acorns. Some are bigger than others, but all are edible and useful once processed. There are two major groups of oaks that you’ll likely encounter–the red oaks, who produce oil-rich, bitter nuts that dry quickly, and the white oaks, who produce more moist, slightly less bitter nuts that dry more slowly.
As far as the forager is concerned, identifying specific species of oaks is not quite as important as being able to identify the difference between red and white types of acorns. Here’s some general guidelines. Generally (but with exceptions) red oaks have leaves with pointed lobes, and white oaks have leaves with rounded lobes. Acorns of red oaks have shells with a fuzzy interior, and acorns of white oaks have shells with a smooth interior. Red oak acorns have scaly caps, white oak acorns have shaggy caps. Armed with those keys, and a tree ID book as a backup, you’ll be sure to figure out what you’re dealing with when you find a nice, big oak full of promise.
Collecting Acorns
Acorns begin to drop to the ground in late summer, and they continue to drop until the fall. Autumn windstorms and rainstorms really help beat them down from the oak trees, and if any of the structures on your property have a tin roof, you’ll really know that harvest season has arrived as they rain down like hail!
The best time to start collecting acorns is not, however, when they first start to fall. Oaks have two distinct phases where they drop acorns–an early drop, and then the good drop. When you first notice that oak trees are dripping with acorns–this is not the time to collect nuts. If you do, you’ll be incredibly disappointed to find that pretty much every single one is bad. In some fantastically designed, inexplicable way, oak trees know what nuts aren’t developing well or are infected with insects, and so they rid themselves of the unworthwhile nuts as soon as they can. Many of these acorns will be unripe, underdeveloped, or still have their caps firmly attached (a sure sign of a bad nut).
It’s the second drop you want to watch for, usually happening sometime in October. These nuts are the good ones! You can crack open a few acorns with a rock to test them if you’re not sure, but I usually find that about 90% of the acorns gathered from the second drop are absolutely perfect.
Of course, not everyone has the luxury of a line of oak trees to monitor all fall. So how can you tell the difference between the good and bad nuts that carpet the ground? Though no one has acorn x-ray vision, there’s some signs that you can use in the field to help you gather as many good ones as you can.
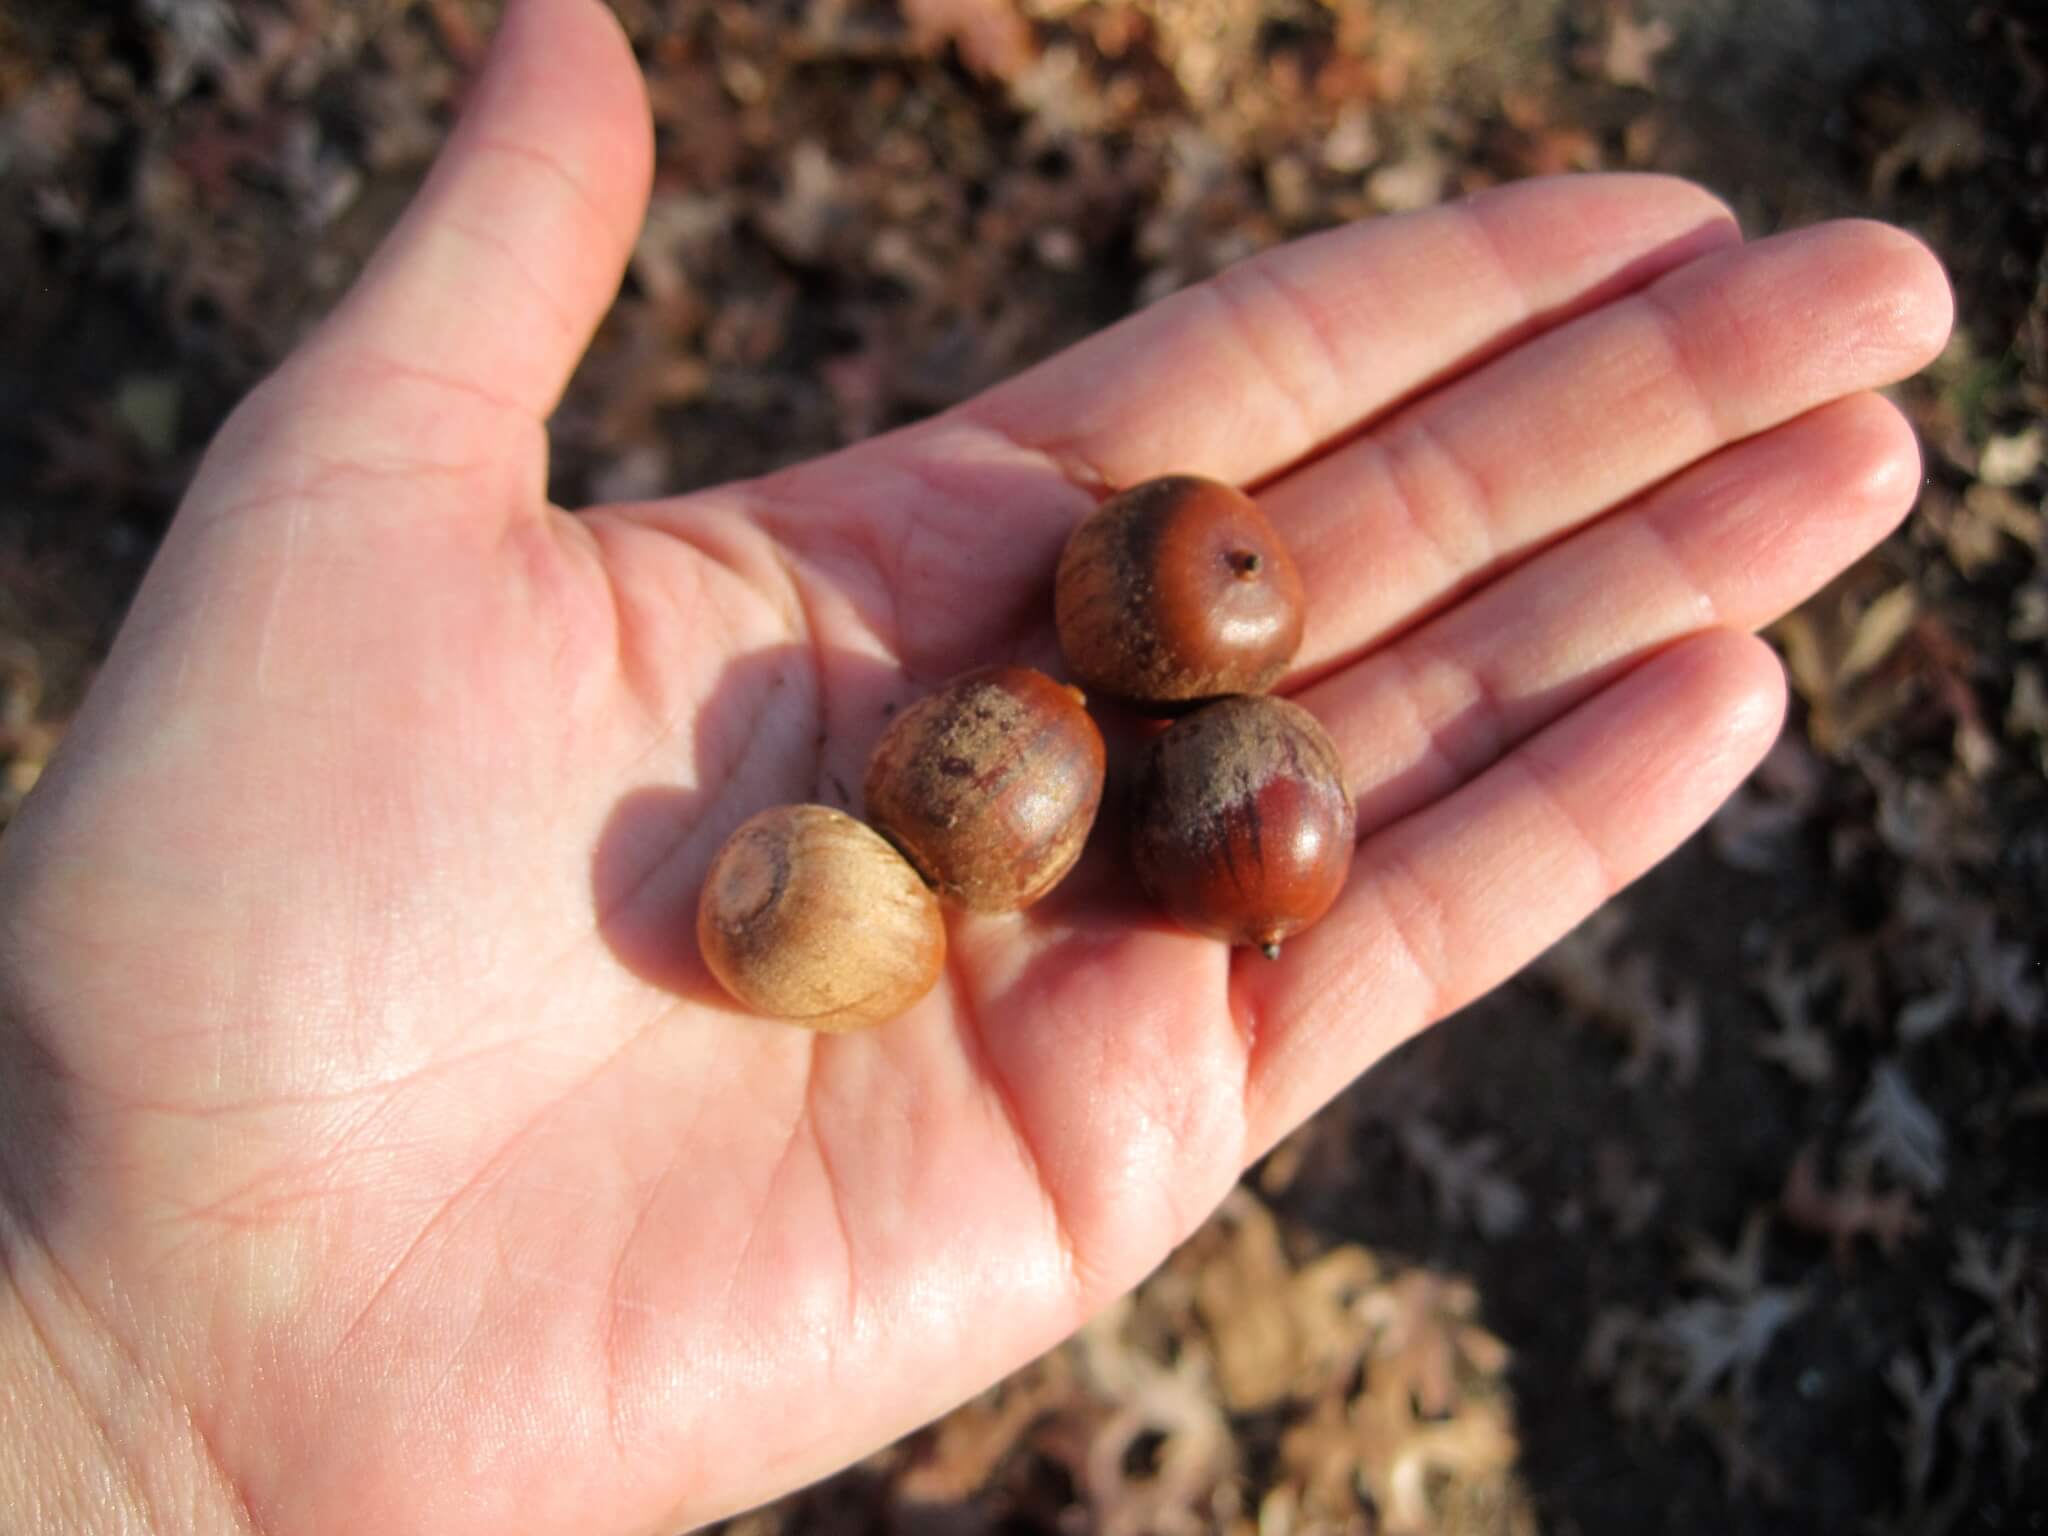
Good acorns look good, and feel heavy in your hand. They’re usually a bit shiny, like polished wood, and have clean-looking, tan discs on the top.
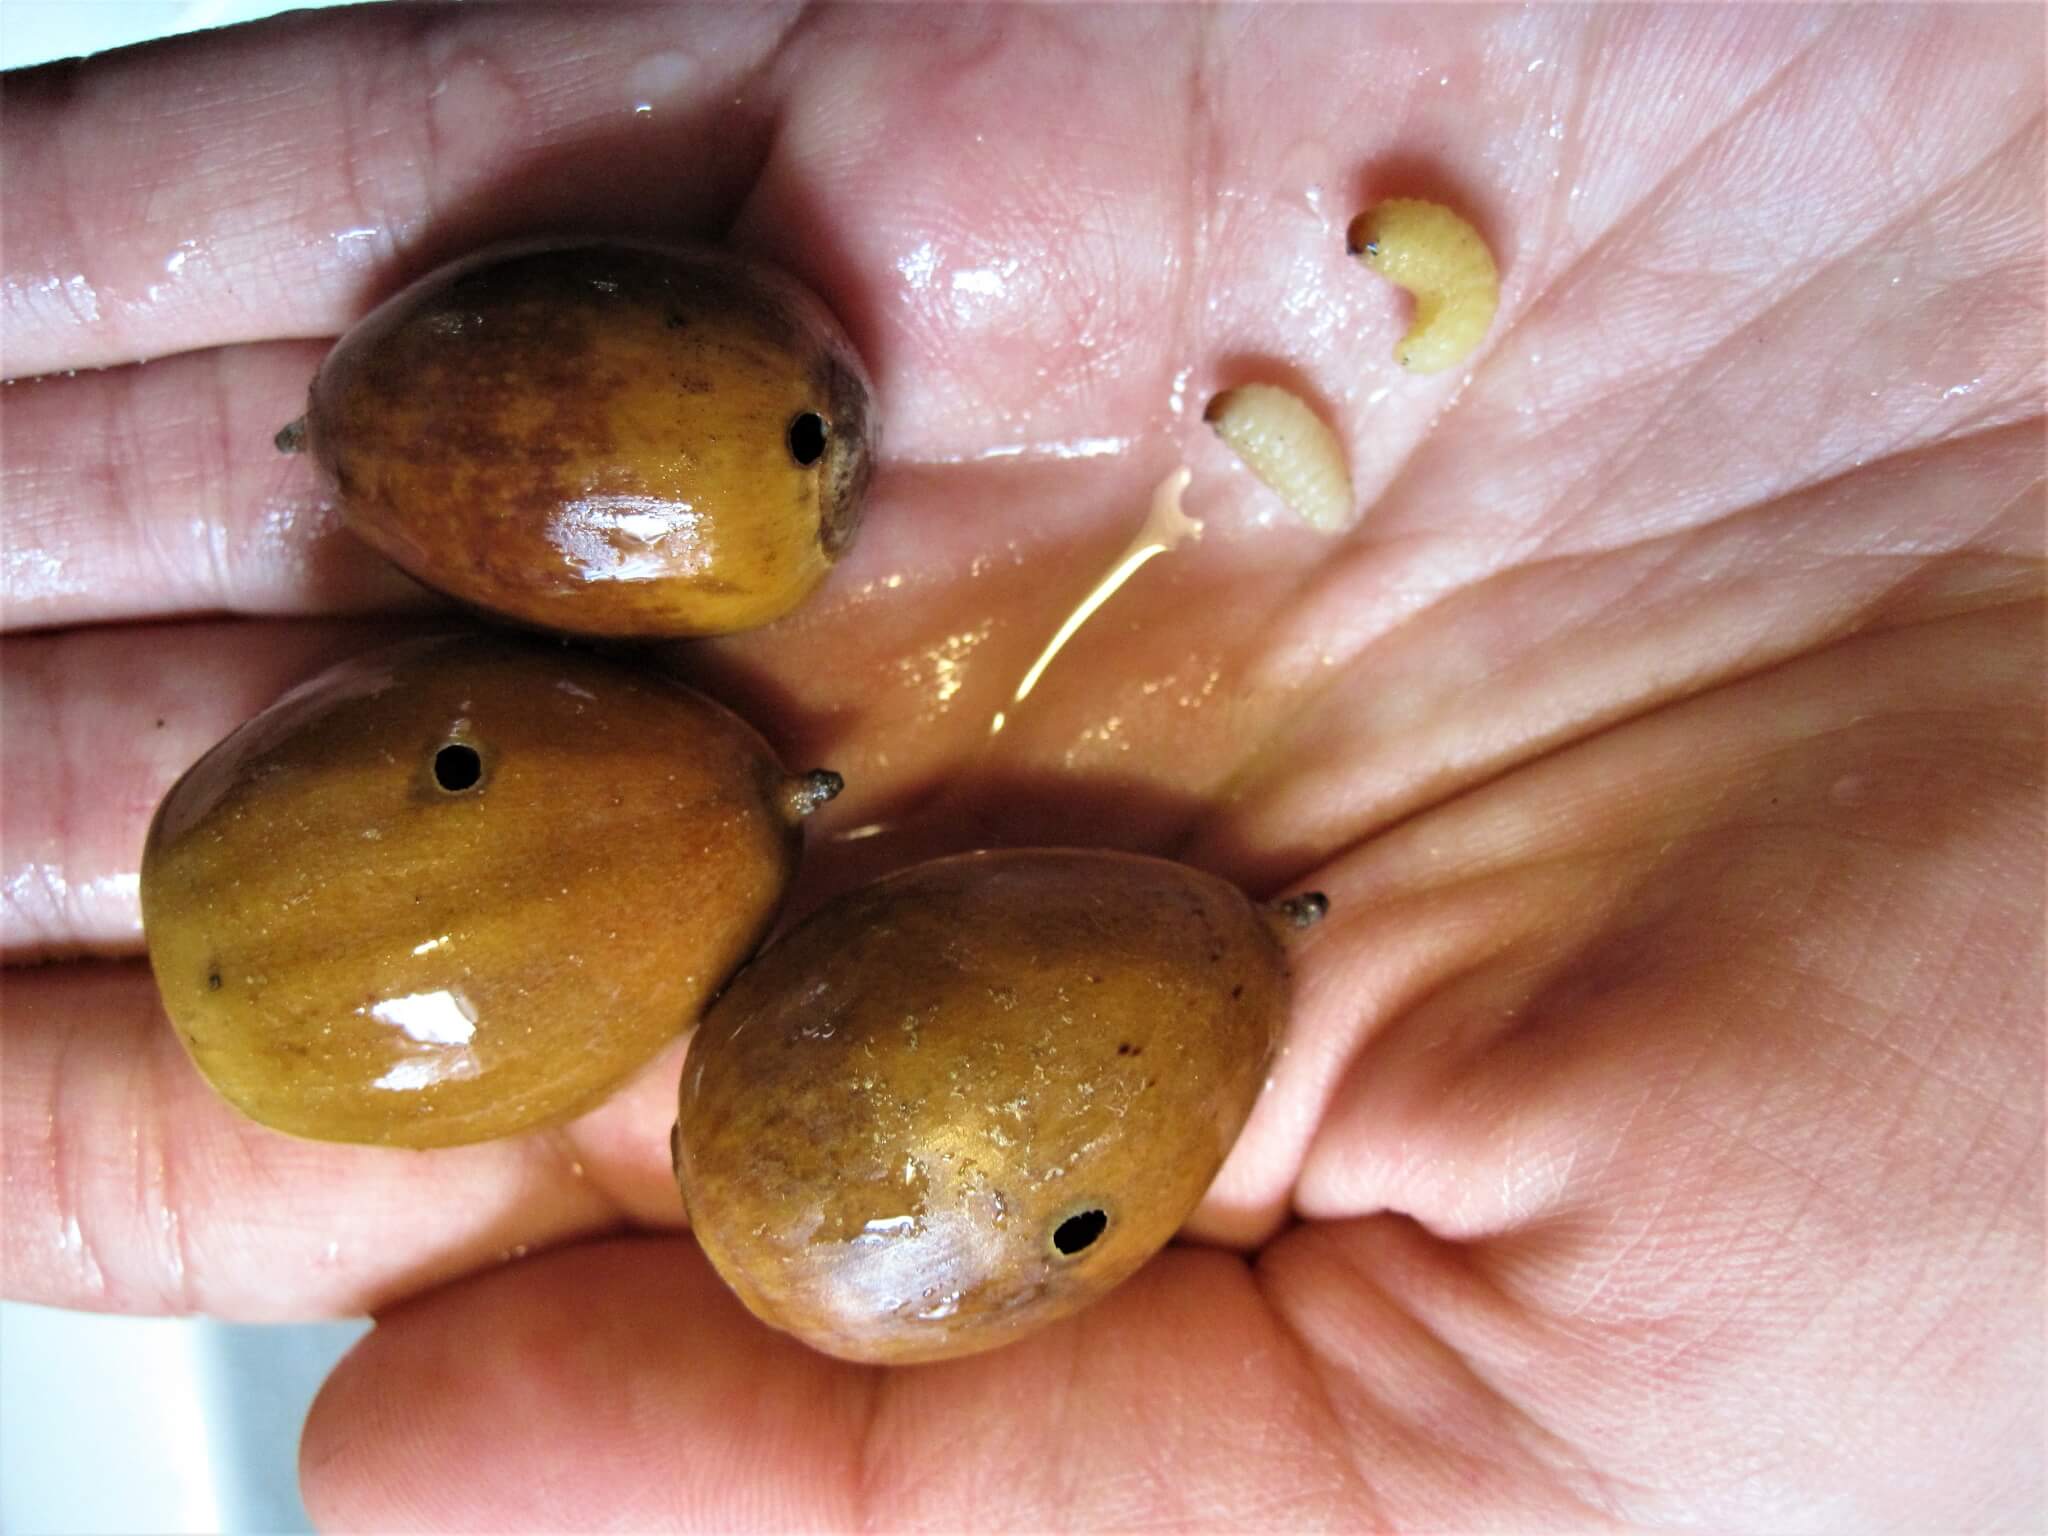
Bad acorns come in many forms. Here’s the ones to avoid. Discolored acorns, or ones with dark spots on their sides, are bad. Undersized nuts with the caps attached were dropped early, and are bad. Discolored spots on the disc are also indicators of bad nuts. Acorns with the caps still firmly attached are no good. Acorns that look weathered and dull are probably last year’s acorns, and usually rotten. Finally, acorns with little holes in the side have been already eaten by acorn weevil grubs, and are only full of frass. Get used to those little grubs by the way–we’ll be talking about them more later!
Though that seems a lot to remember, once you become familiar with good and bad acorns, you’ll be able to distinguish them almost instinctively in the field as you collect them. Taking the time to try to only collect good, clean nuts will save you lots of trouble later on, so it’s worth the effort! And it’s a really pleasant task in the warm, early fall as you enjoy the dappled sun with acorns pleasantly kerplunking into your bucket.
In terms of gathering nuts, I most heartily recommend doing it by hand. Though there are nut-picker-upper type tools, they are indiscriminate, and can’t tell the difference between a good nut, bad nut, rock, or bottle cap. The time you save in picking up nuts will be lost in having to sort through the junk you’ve also picked up. After several years of foraging acorns, the simplest approach has consistently been the best for me. Hands and a 5-gallon bucket do the job best.
Part Two: Processing The Haul
Bringing them home and getting them dry
When collecting acorns, I advise to keep red and white acorns separated in different buckets. That way, you can jump on cracking and processing the white oak acorns as soon as you can. Since white oak acorns contain a lot more water, they mold very easily if left in a heap. And it’s super-disappointing to put off sorting and drying your acorn haul for too long, only to discover that your entire cache of nuts is a stinky pile of blue mold. The red oak acorns certainly shouldn’t sit in a bucket unattended either, but they can be spread in a single layer and easily dried in their shells until you’re ready to work with them.
So that said, let’s talk about getting those nuts dry!
If you can’t crack and process them immediately, at least lay them out flat in a single layer somewhere where air can circulate around them. I do this in a refrigerator that has been converted into a solar dehydrator. Lacking that, a bed sheet spread in a dry place or a few old baking pans–easy to find at a thrift store–can also work fine until you can get the nuts shelled. Also, be aware that more acorn weevil larvae will appear soon as they eat their way out of the nuts–even some good-looking nuts are secretly host to the little grubby nut-destroyers.
Catch The Grubs!
I should mention, the grubs are not harmful in the least–they can’t re-infect other acorns, and they don’t bite. All barnyard poultry will eat them with relish, if you give them as a treat. If you don’t have an animal cleanup crew, be aware that the grubs’ sole desire is to get back into the ground so that they can pupate and infect next year’s crop of acorns. It might be best to dispose of them somewhere far from your choice oak trees
At this point, you have some options for storage. Red oak acorns can be dried in the shell, then held in clean 5-gallon buckets until you’re ready to continue. It may take a few weeks to get them bone-dry, so don’t rush it. I would advise against storing white oak acorns in the shell, however. They should be cracked, shelled, and then dried before you attempt to store them. Which brings me to our next step–getting those shells off!
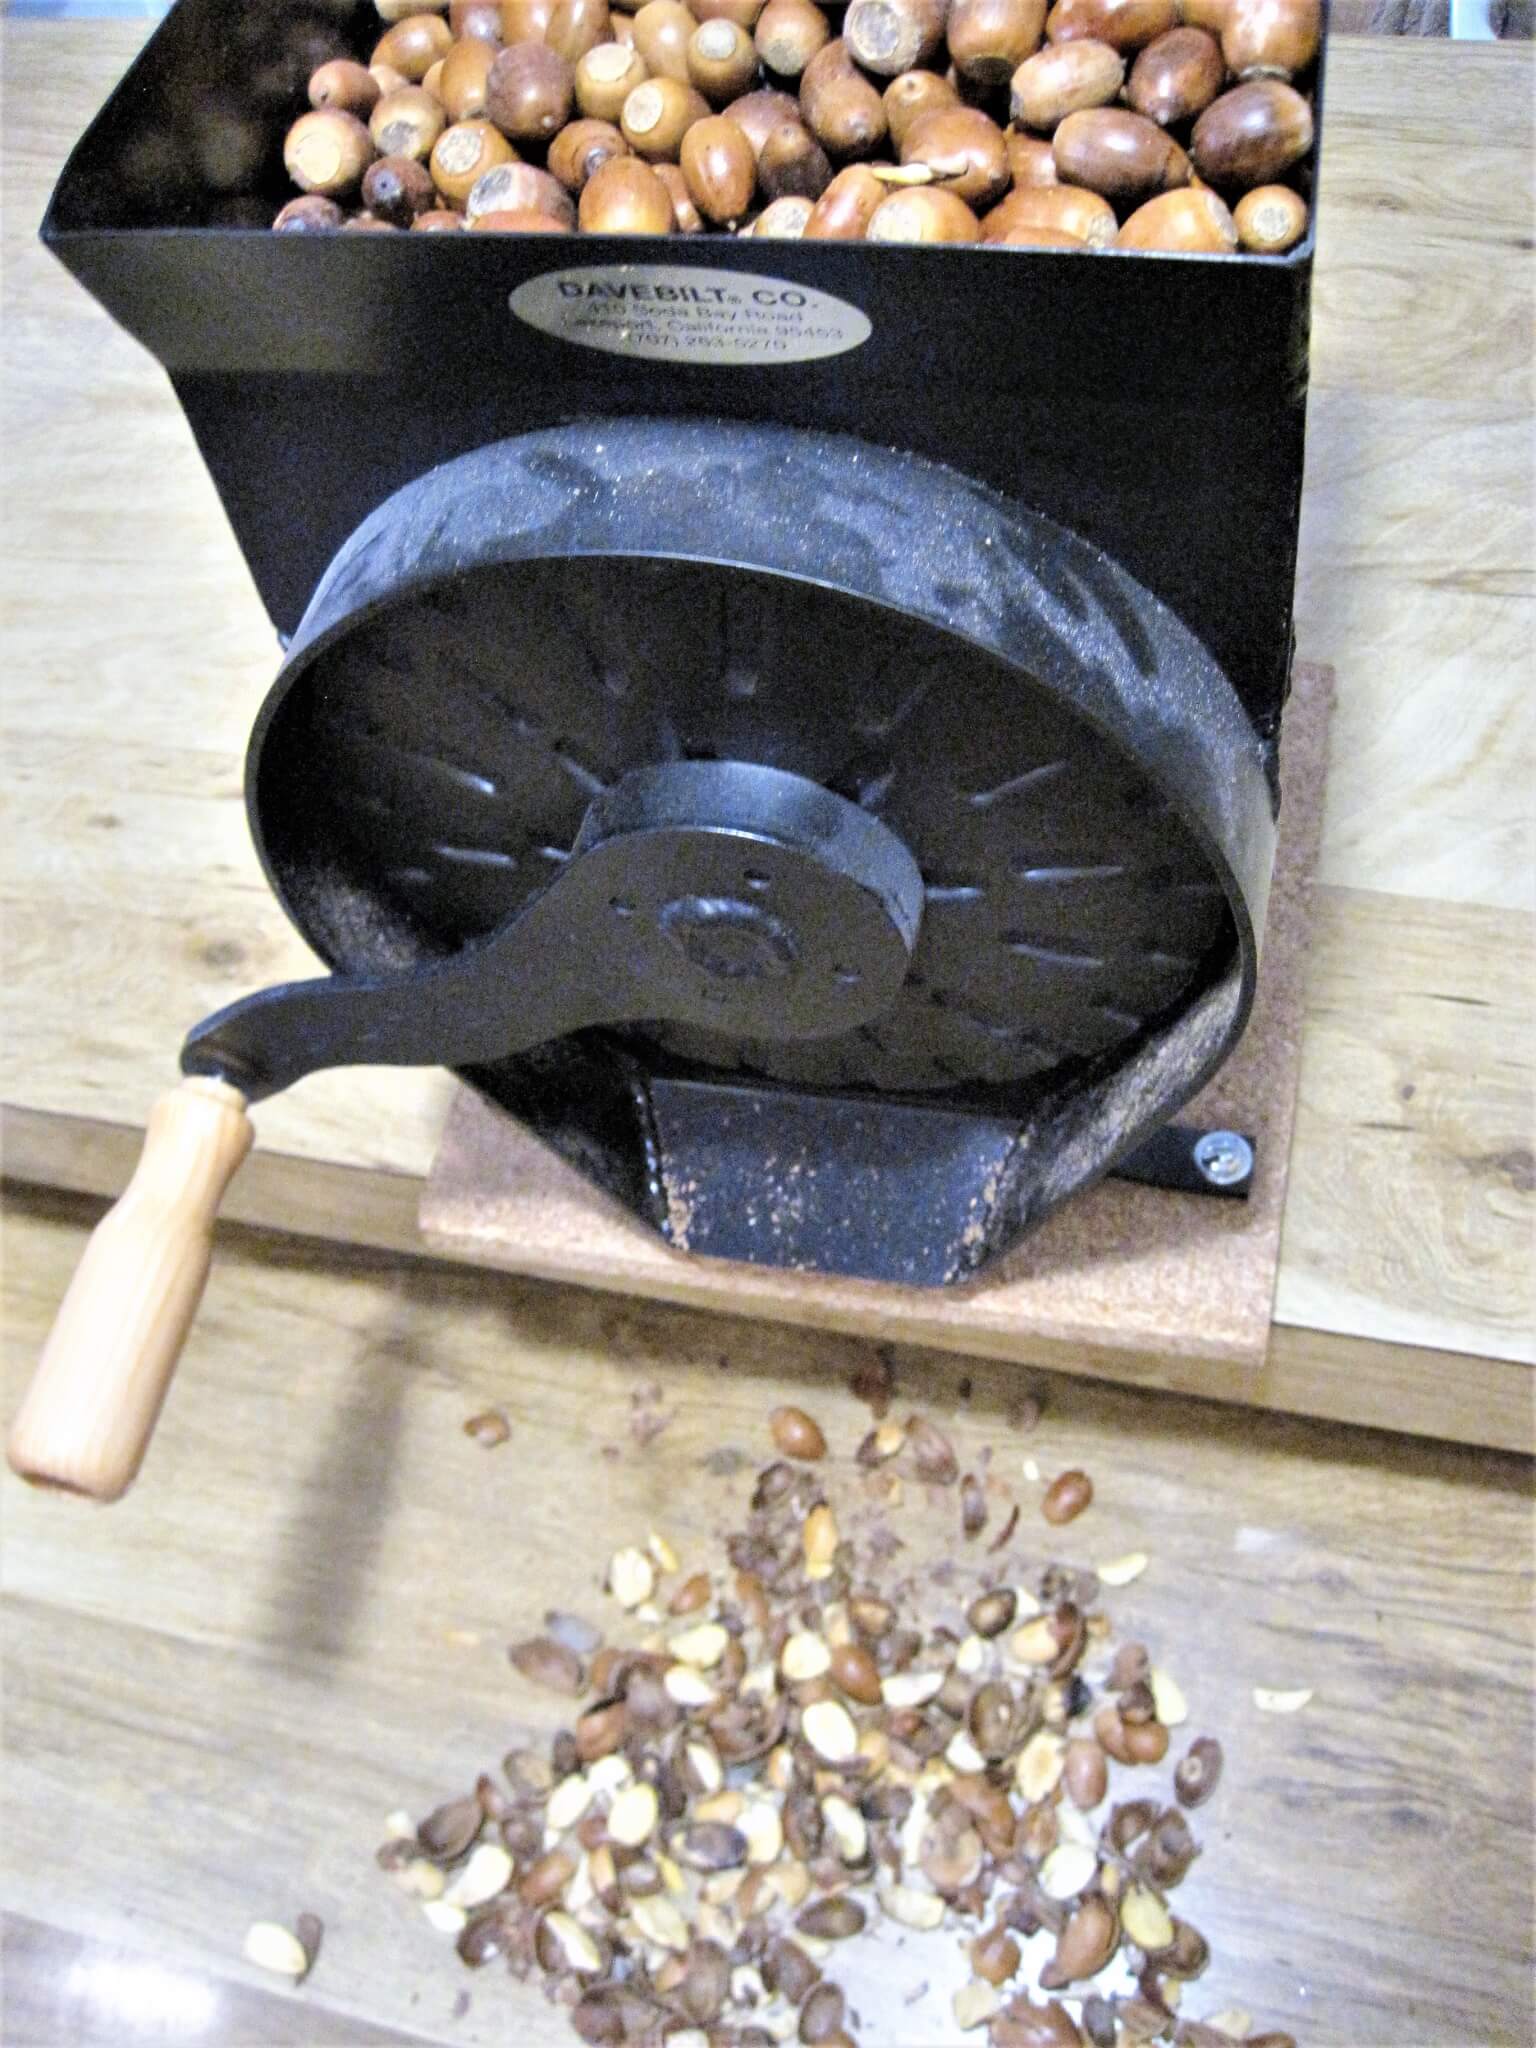
Cracking Acorns
There are several options when it comes to cracking loads of acorns. It can be as simple as smashing them open with a hammer on a flat surface, Layering them between two towels and whacking them with a mallet, or as sophisticated as buying a specialized nut cracker for the purpose. But if you are really interested in making acorns a part of your diet, I heartily recommend the Davebilt nutcracker as a huge, huge time saver. Hand-cranked, made in America and built to last, this is a solid tool that you’d be able to pass on to your kids, and is good for most any type of nut. It runs close to $200, but I can personally attest that the time and effort saved made it worth the price within our first season of using one.
I do the bulk of my sorting after cracking acorns. Separating the nutmeats from the shells is a good activity to do with a friend and conversation, some good music, or a group of competitive children. You’ll soon see that its inevitable that some bad acorns will ride along with the good ones, but once they’re cracked open, the good is super-easy to separate from the bad.
Any that are moldy, had clear evidence of being nibbled by bugs, or were covered with dark spots can go into the chicken/compost bucket, and all the tan, waxy-nice nutmeats can either be dried for later processing, or moved on to the next stage. If you find that a lot of your fresh, red oak acorns look good but aren’t coming out of their shells, save yourself some frustration and dry them further. Prying red oak nutmeats out of the shell is incredibly frustrating, but they’ll simply drop out of shells once completely dry.
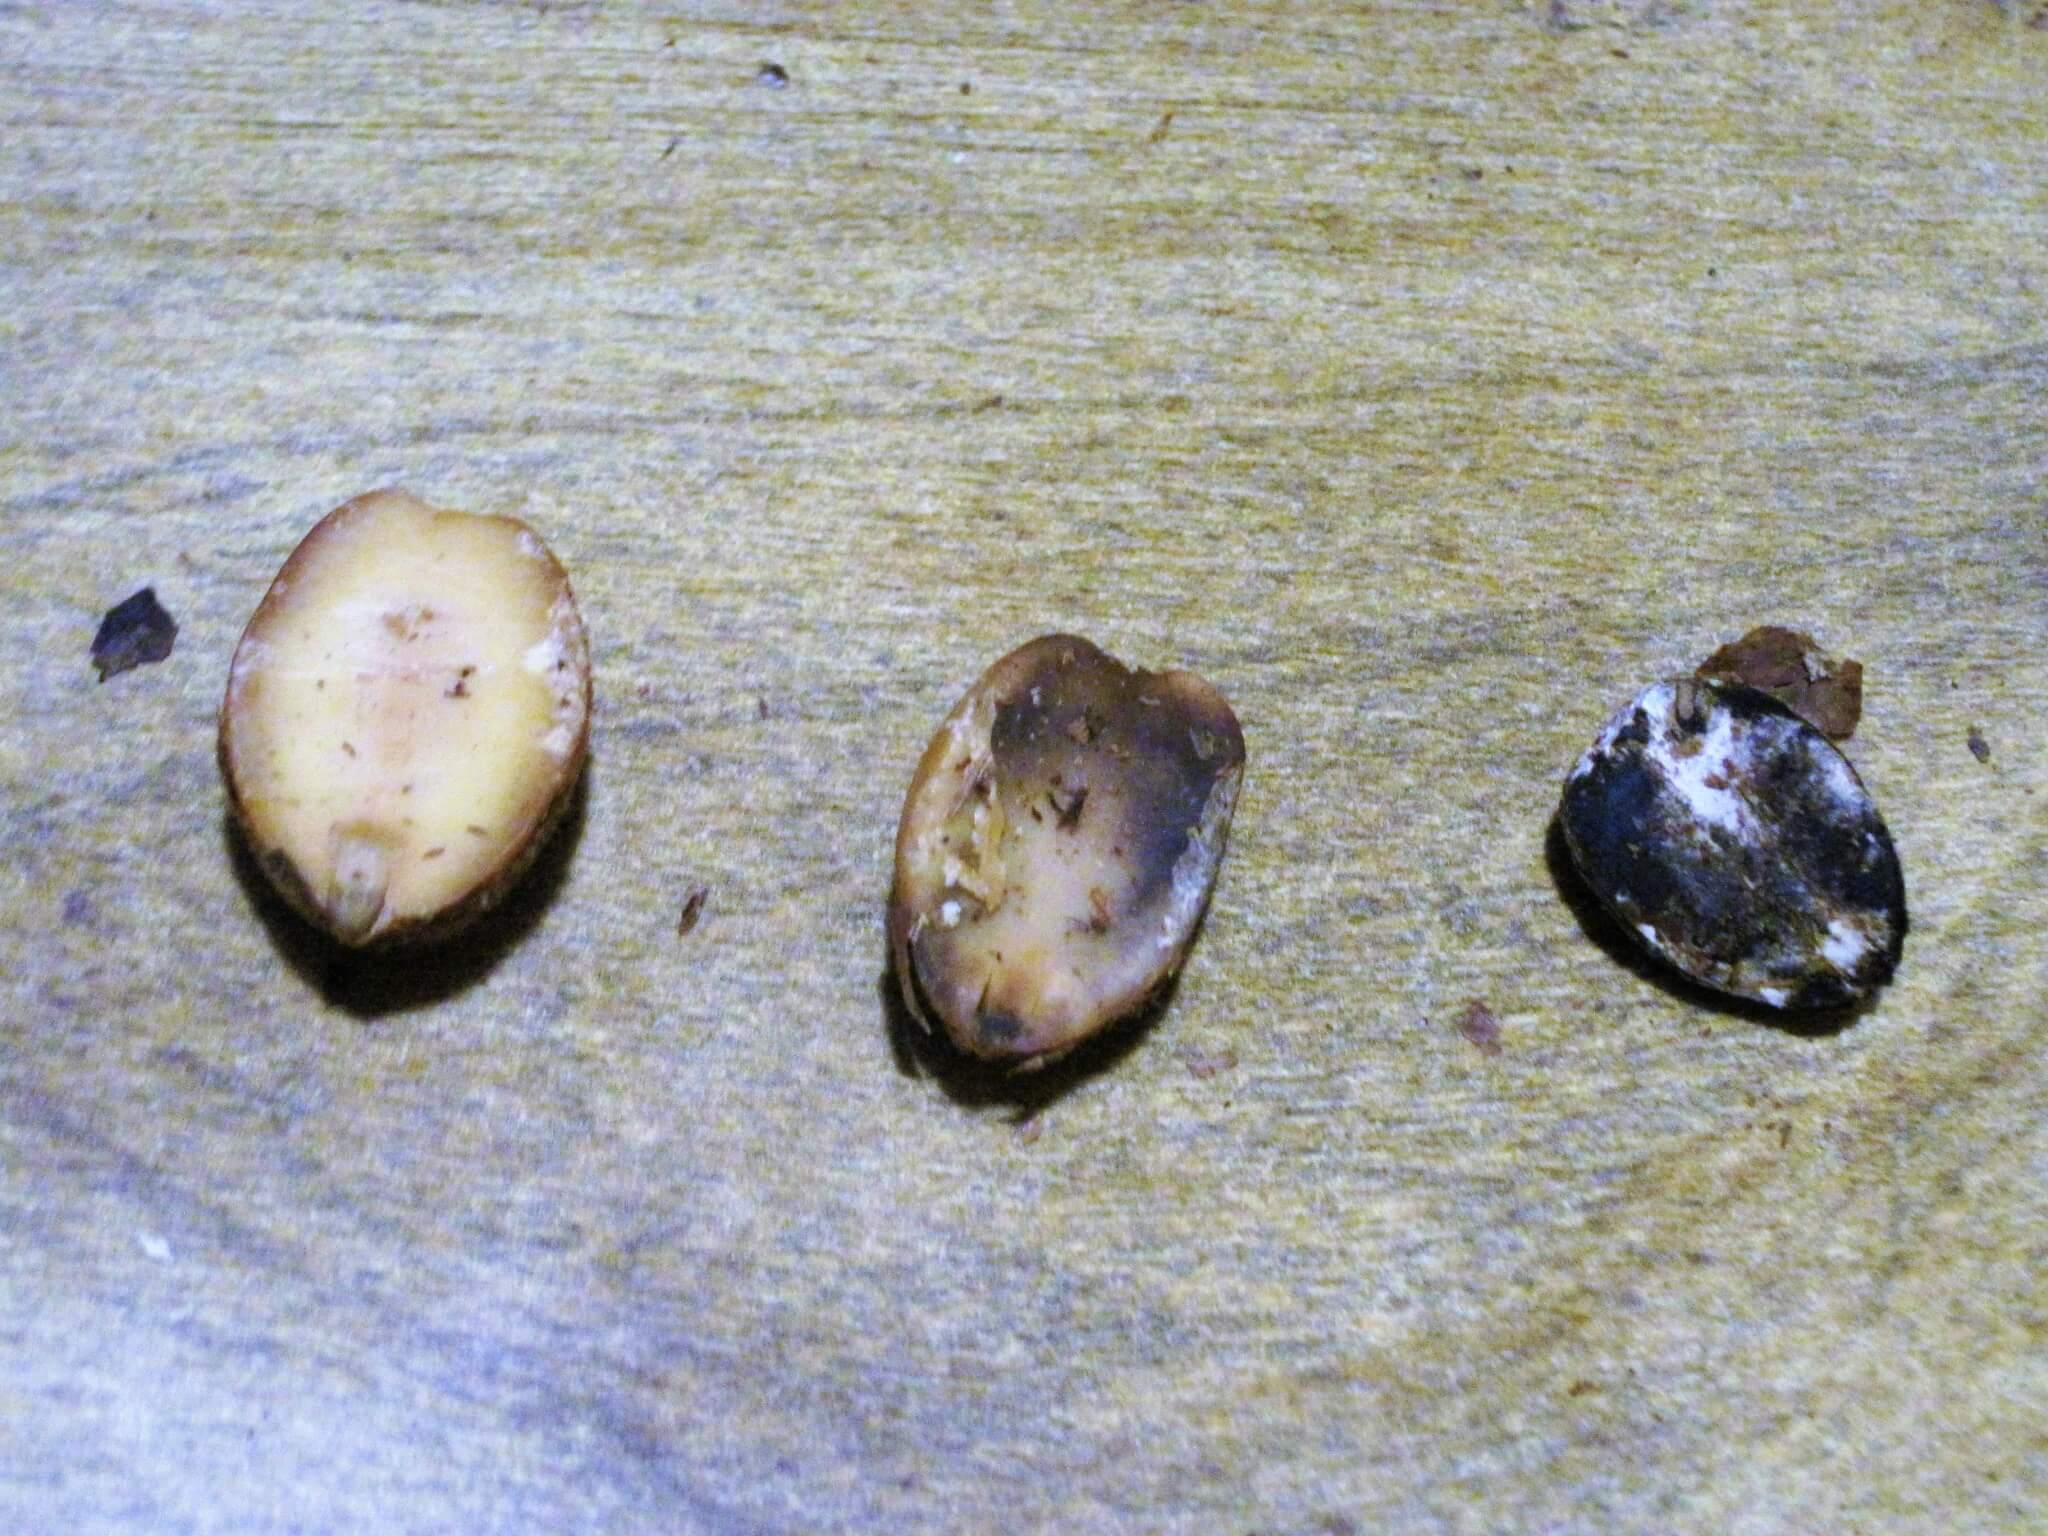
While sorting, you’ll find lots testas (the dark brown, papery coating over the nut) also come off. Some resources say that you must remove every trace of the testa to have tasty flour, but I found that it really didn’t make a difference.
That pile of nutmeats can now be dried until they’re rock-hard and stored for later processing. This is a wonderful feature of the dried nuts–they can be stored for a while. During years with a very heavy acorn crop, you can stock up on nuts to give you a cushion for when there’s a poor crop season. So at this point, you can put your harvest into secure storage or move them on to the next step–leaching!
Leaching The Acorns
Leaching is the process of using water to remove the bitter, water-soluble tannins from the nuts and make them palatable. It’s possible to eat a single acorn raw with no ill effect, but I don’t know if you’d want to repeat the experience.
There are three types of leaching–cold leaching, chemical leaching, and hot leaching. I’ll only be detailing hot leaching here, as it is the most beginner-friendly and yields results quickly and satisfyingly. If you really get into working with acorns, however, be sure to investigate the other processing methods in the resources at the end of this article–each results in a distinctively different product.
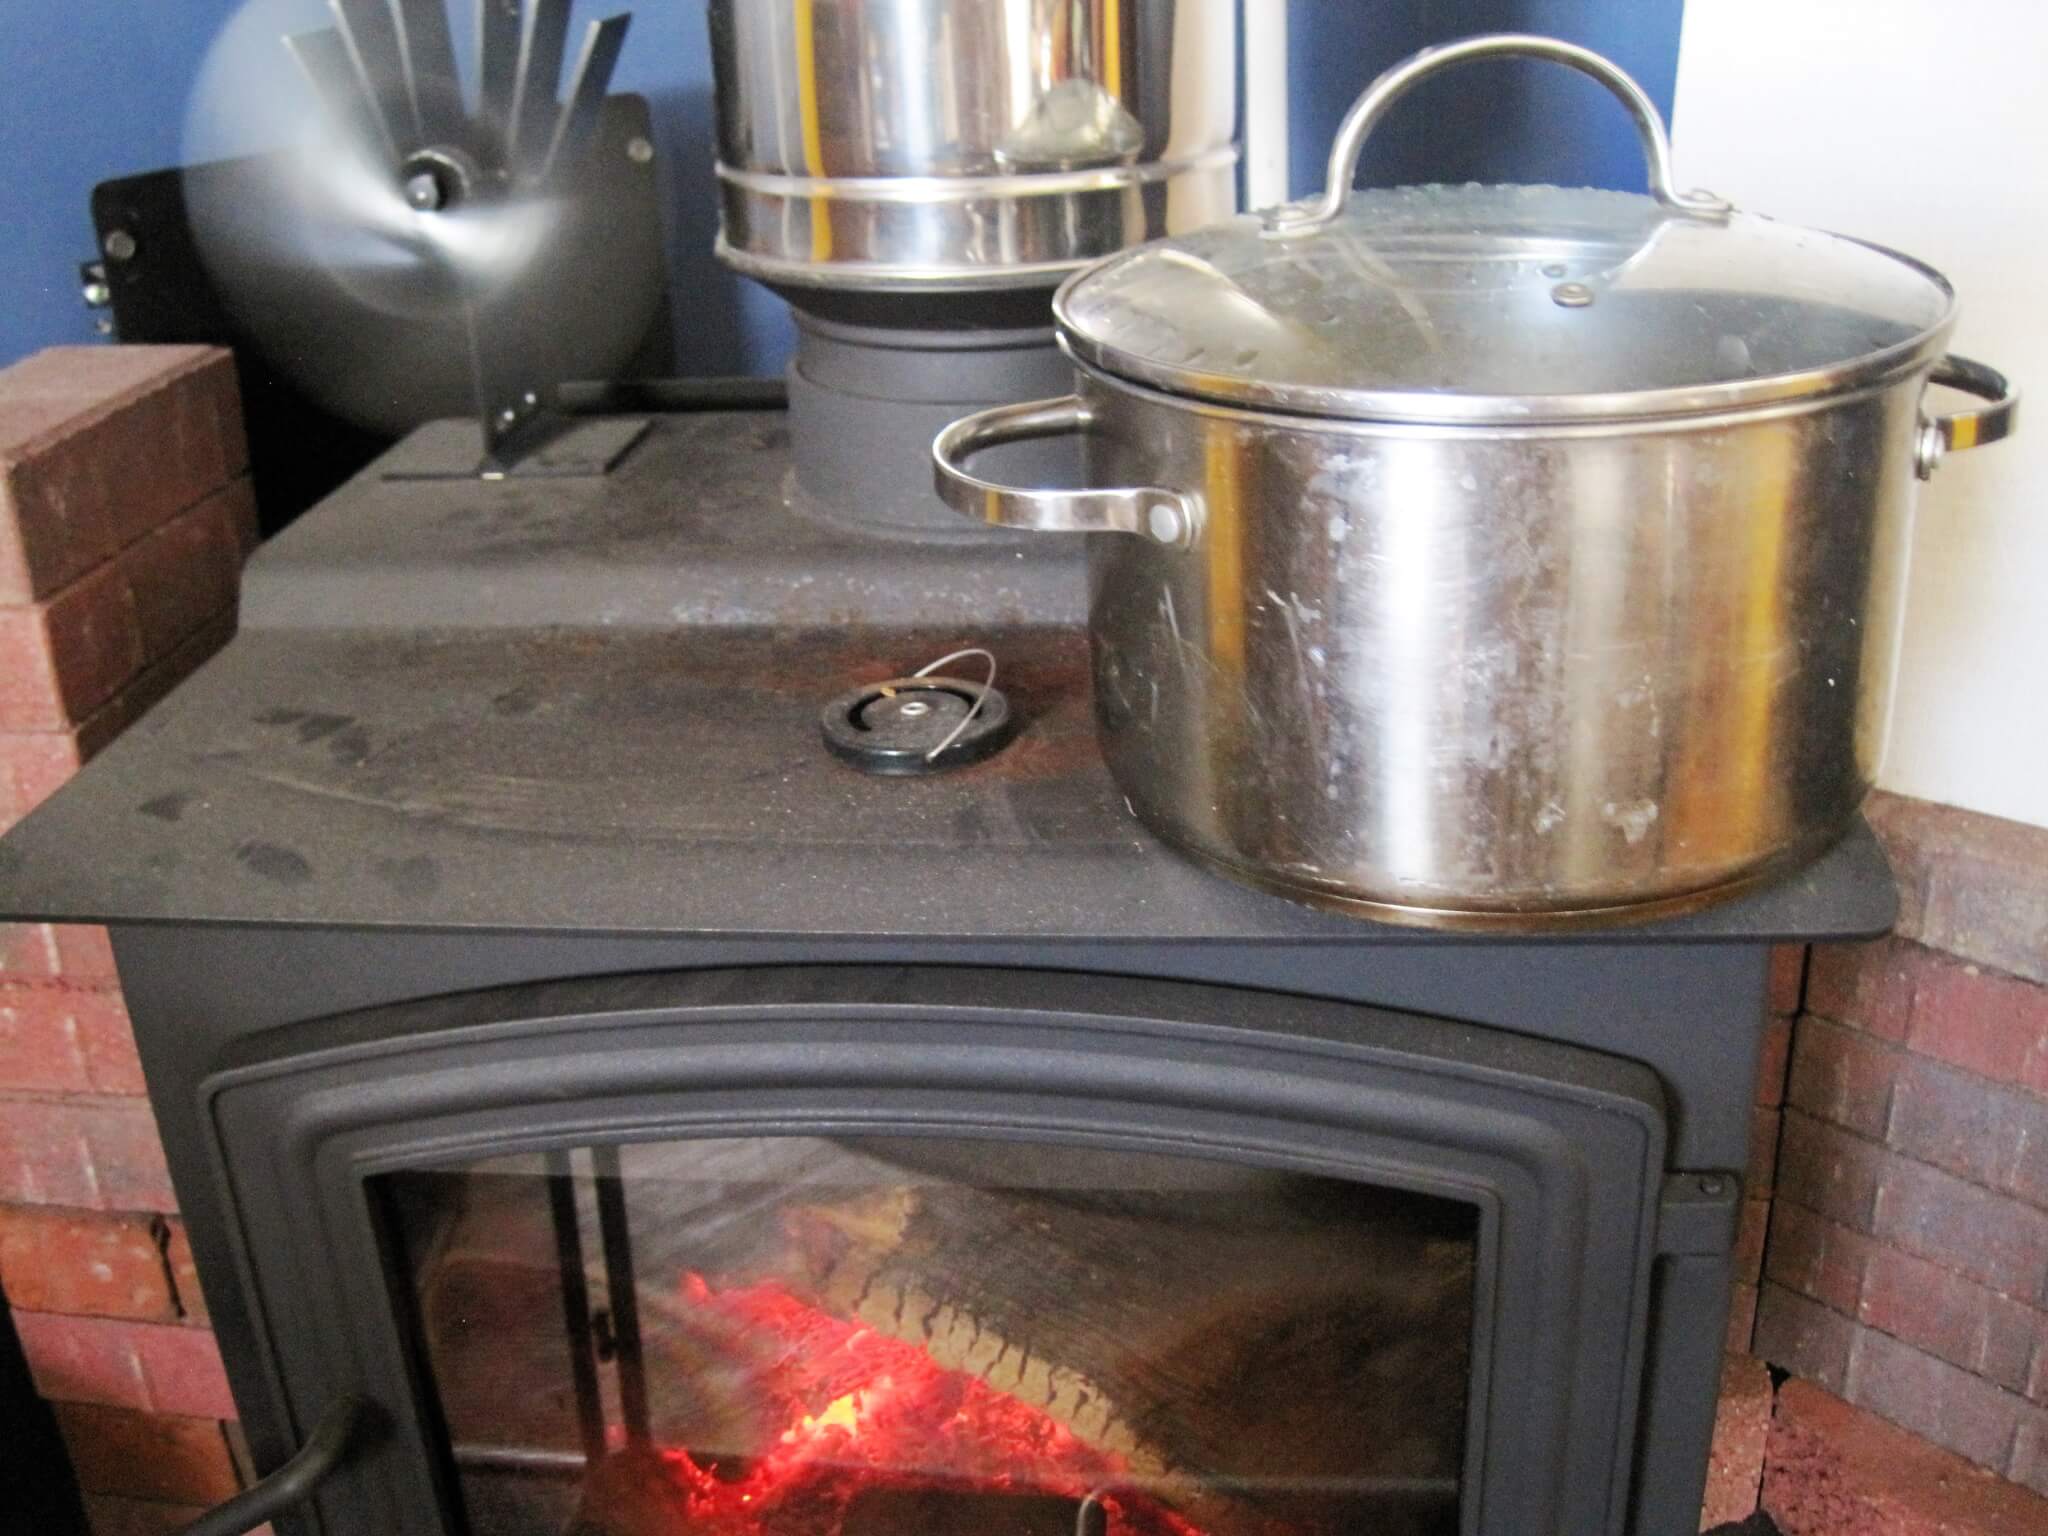
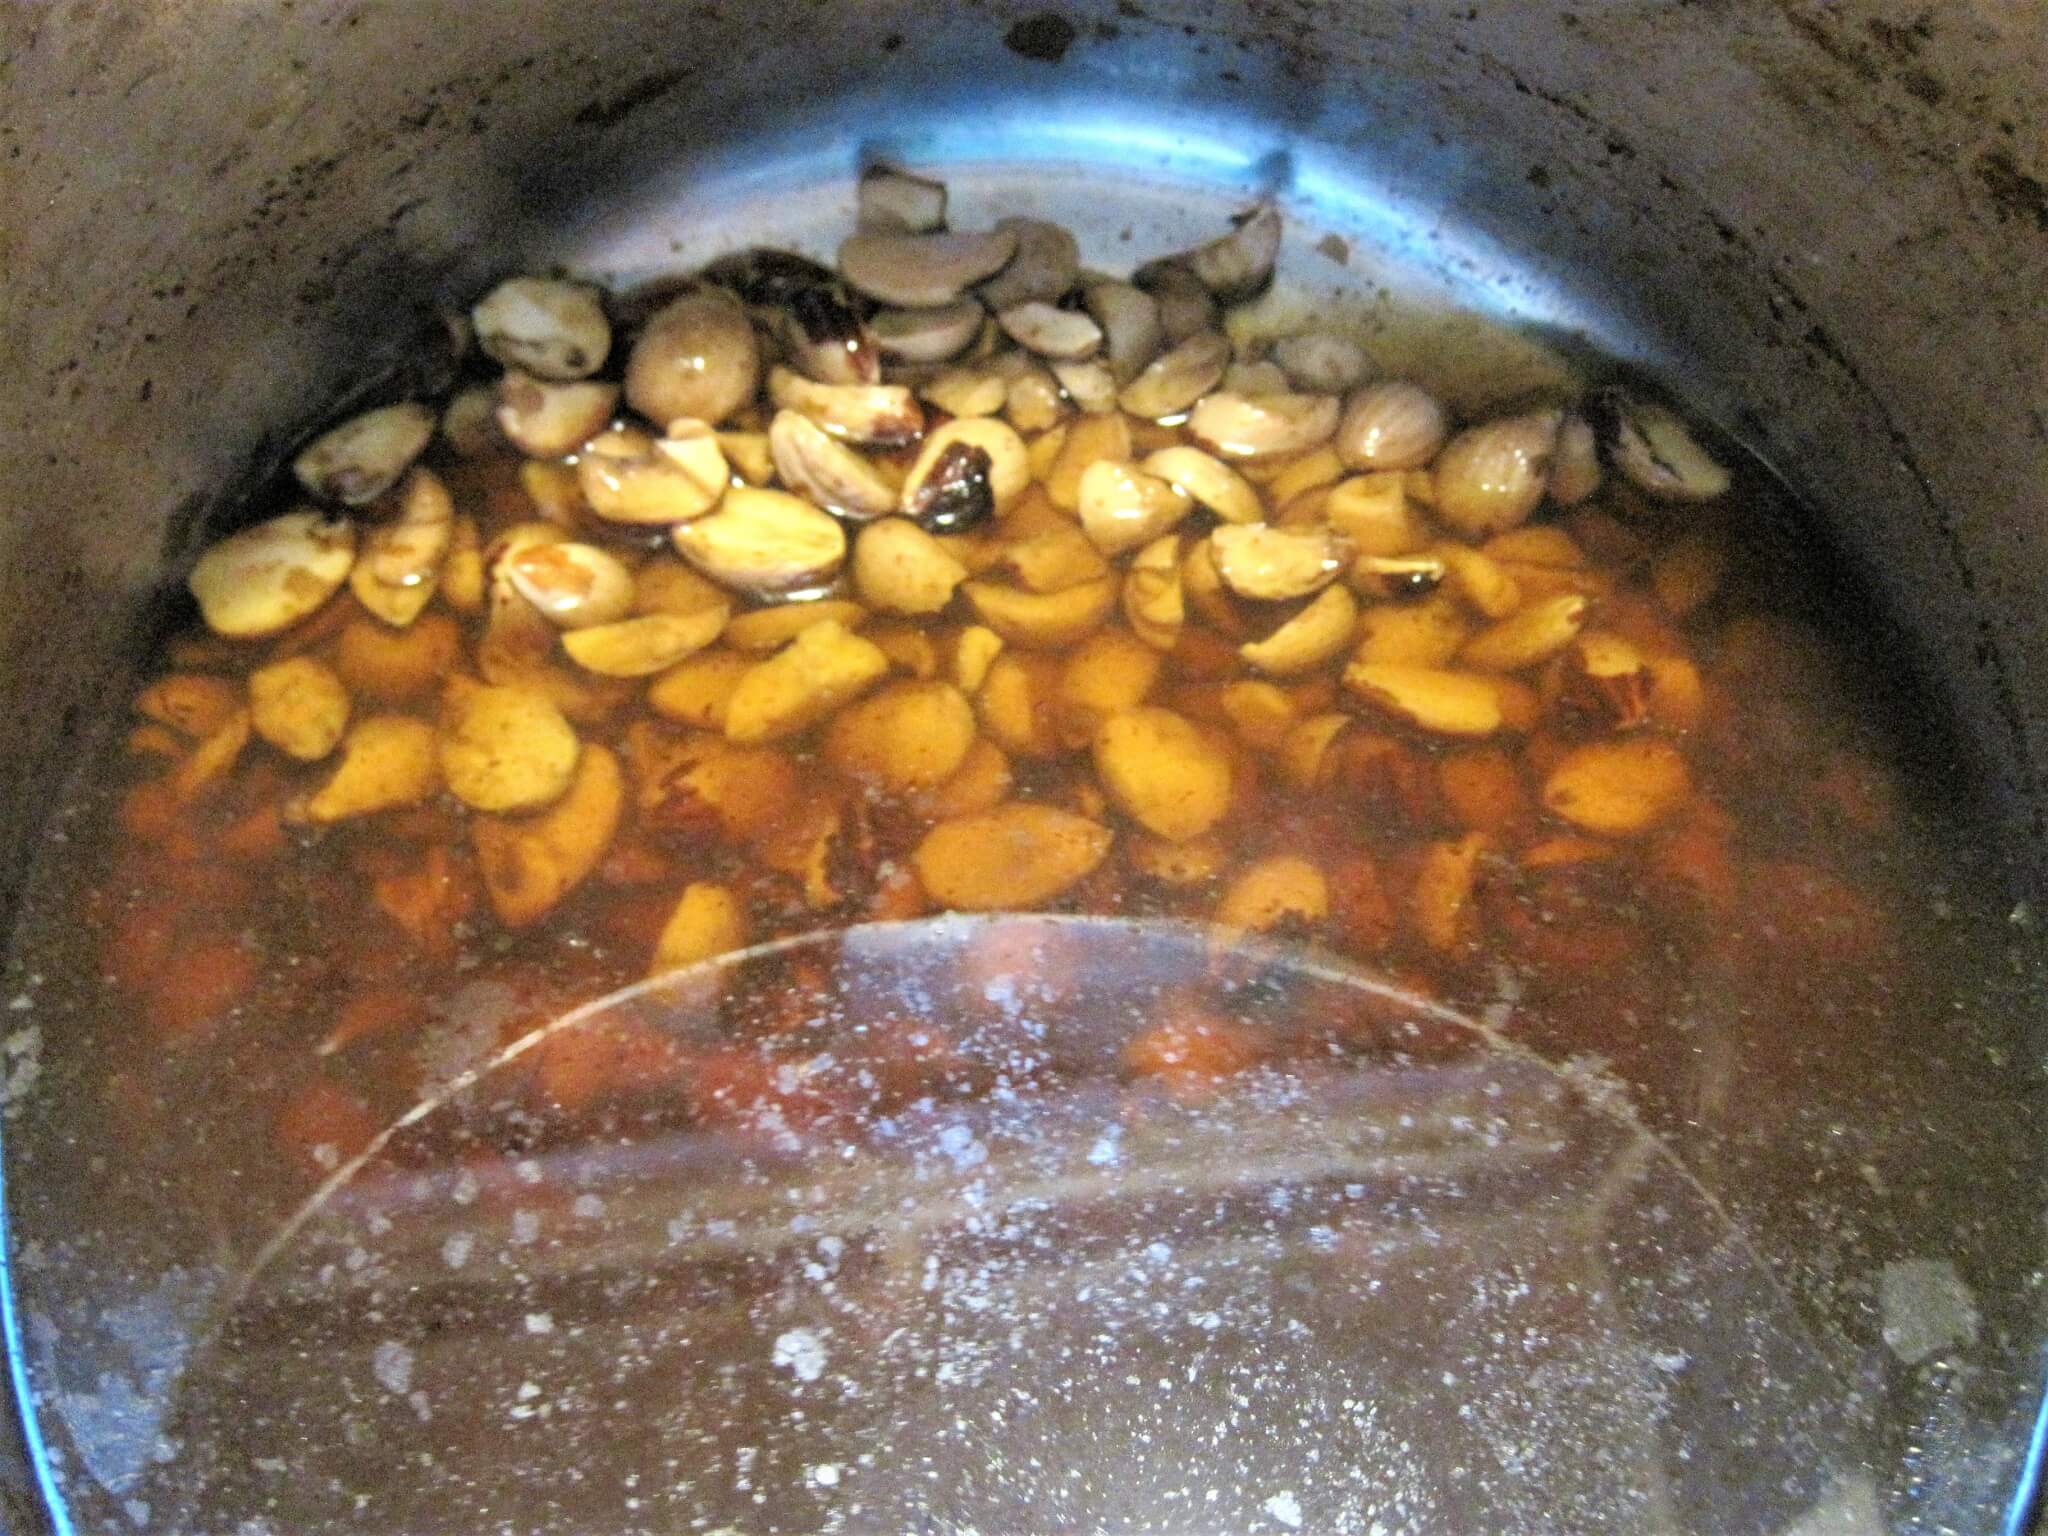
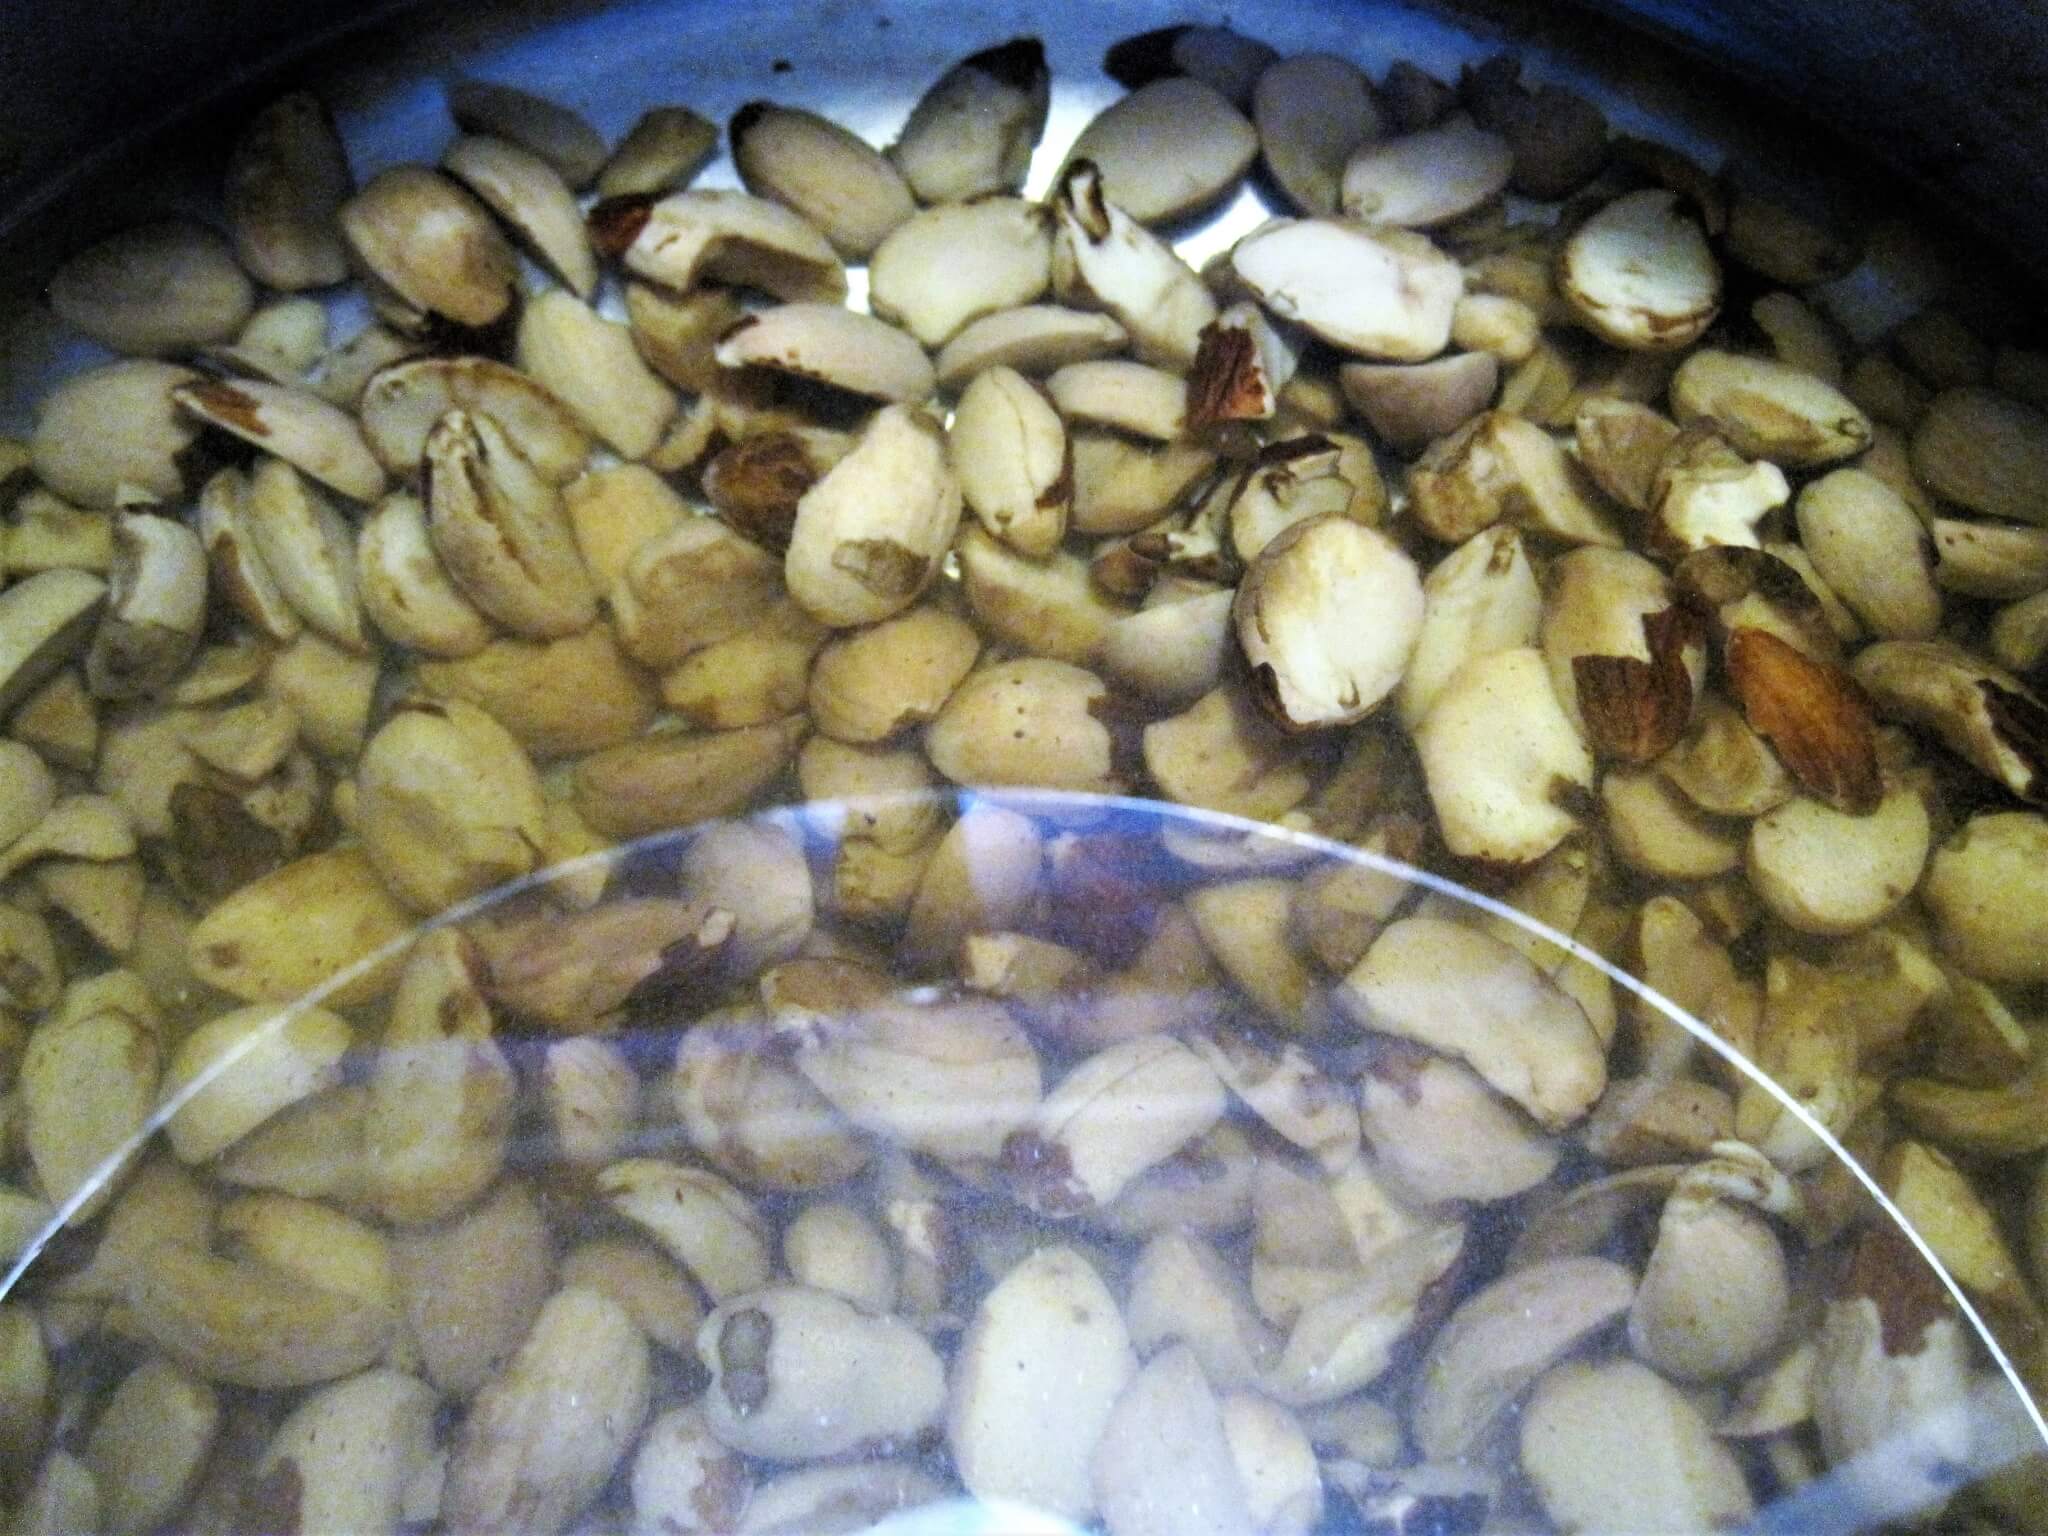
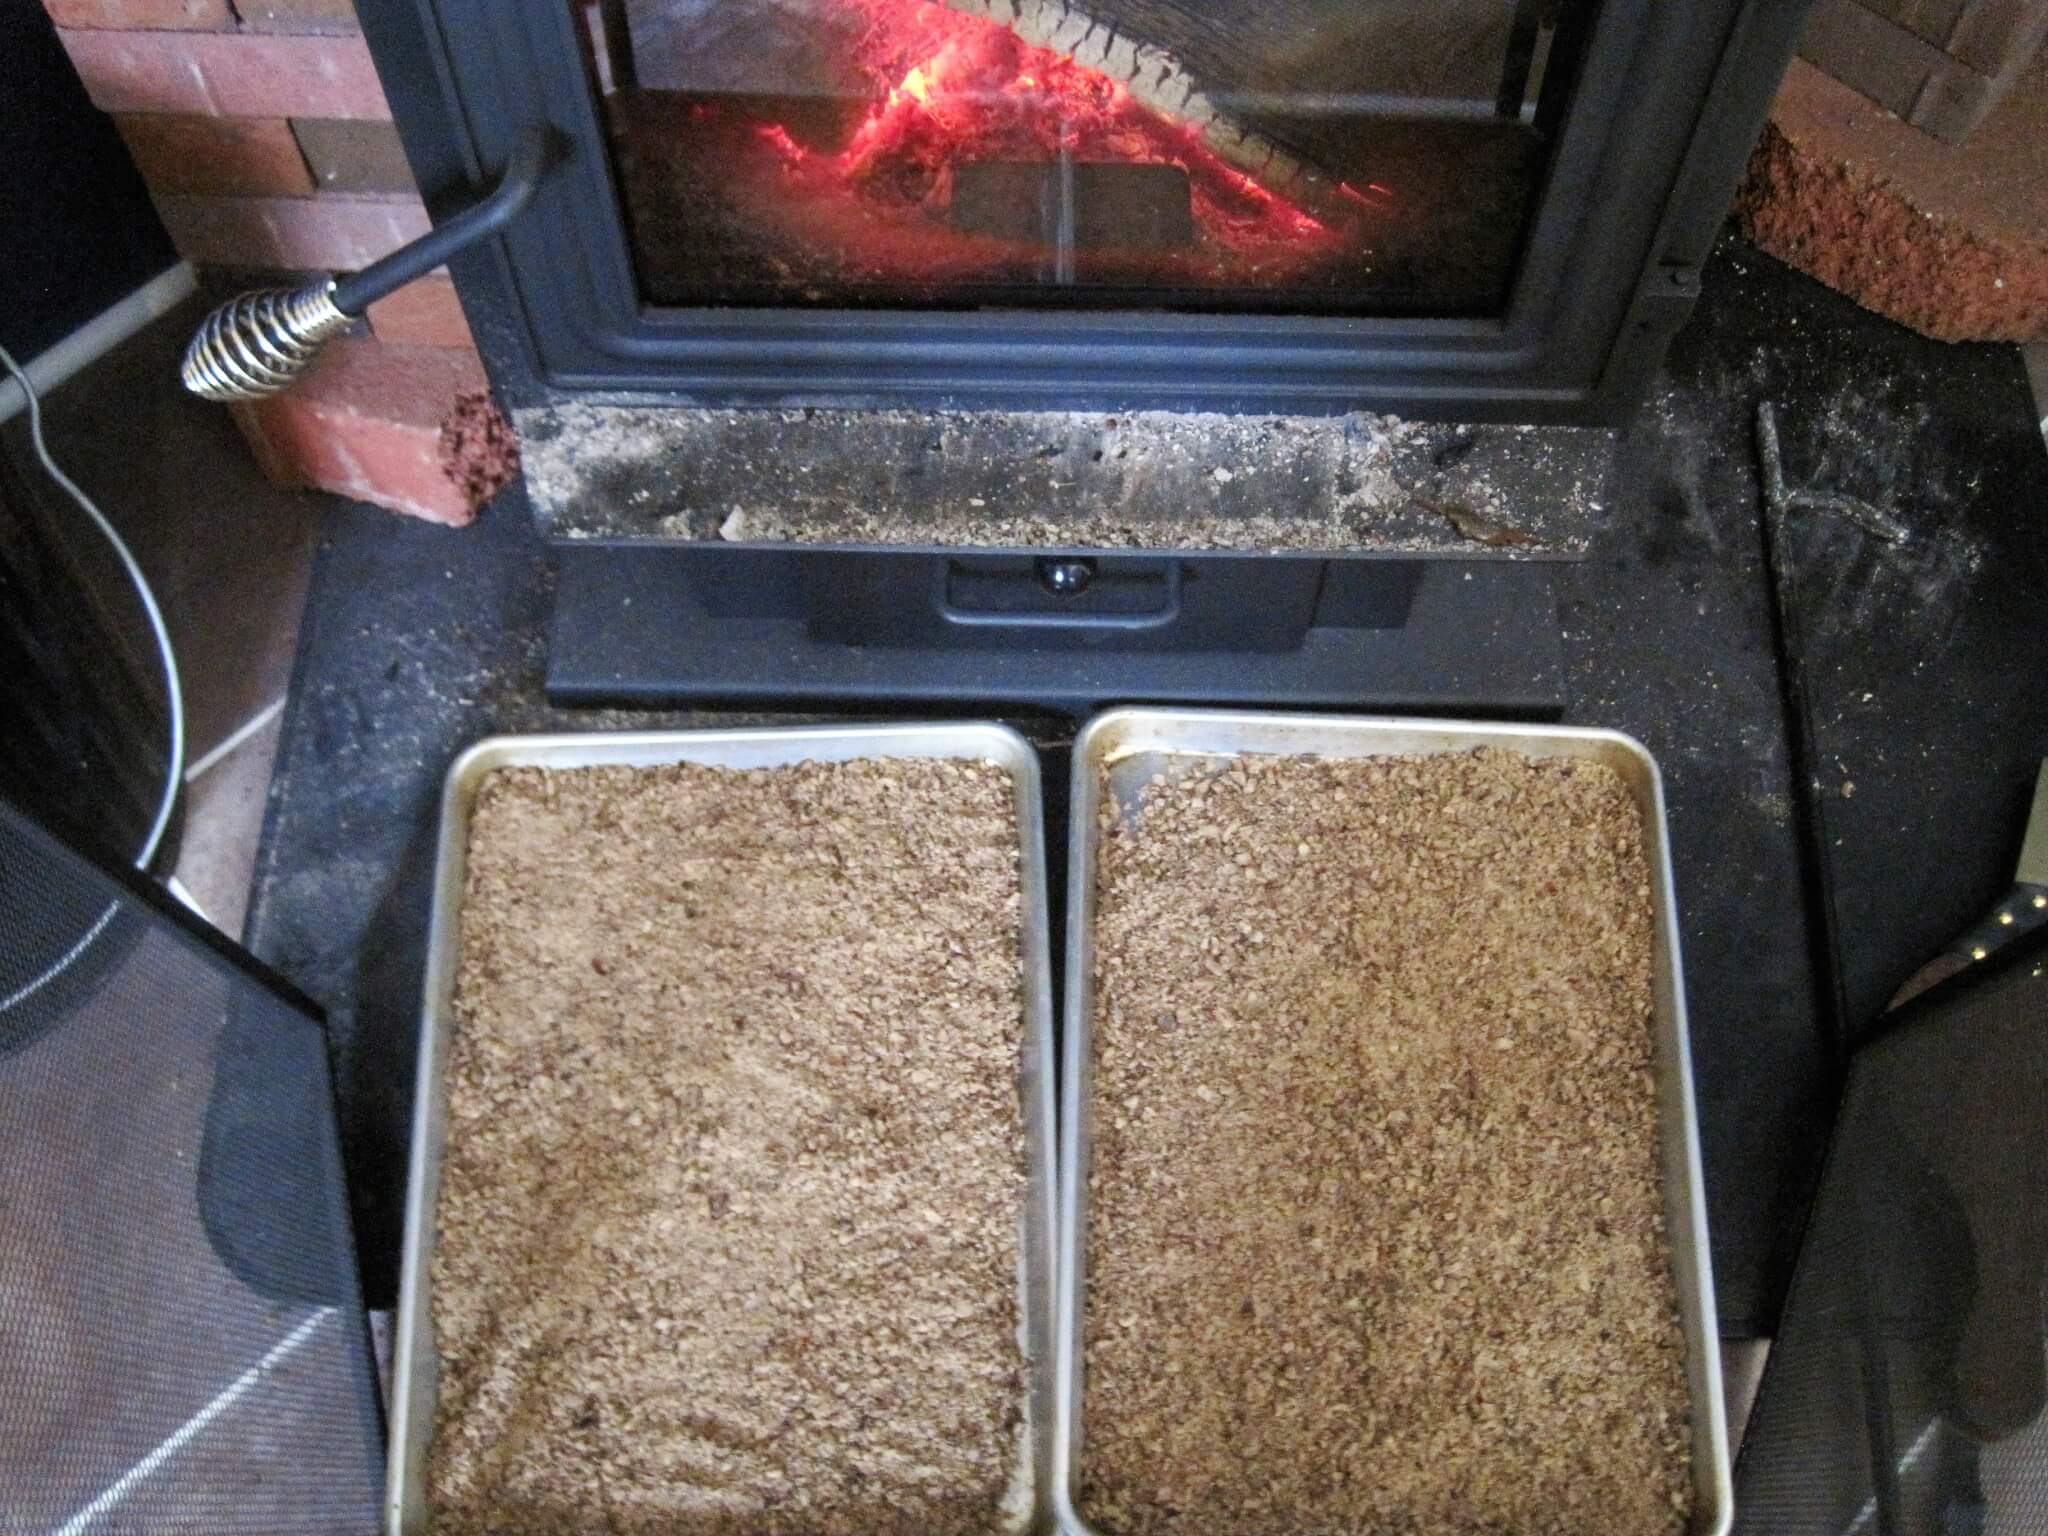
Hot leaching acorns is simple–put the acorns in a pan of water, heat it to boiling, drain off the dark-brown water, and repeat until a sampled nut no longer tastes bitter. You can do this on a conventional stove top on a rainy weekend, but it’s a lot easier and uses a lot less energy if done on a wood stove. The various species of acorns take anywhere from three to ten water changes to have a sufficient amount of tannin removed–you’ll have to judge for yourself when they’re ready. When they taste sweet, somewhat maple-like, and not at all bitter, consider them done. Some resources say that you need to wait until the water runs clear, but it’s not necessary. Taste is more important than looks.
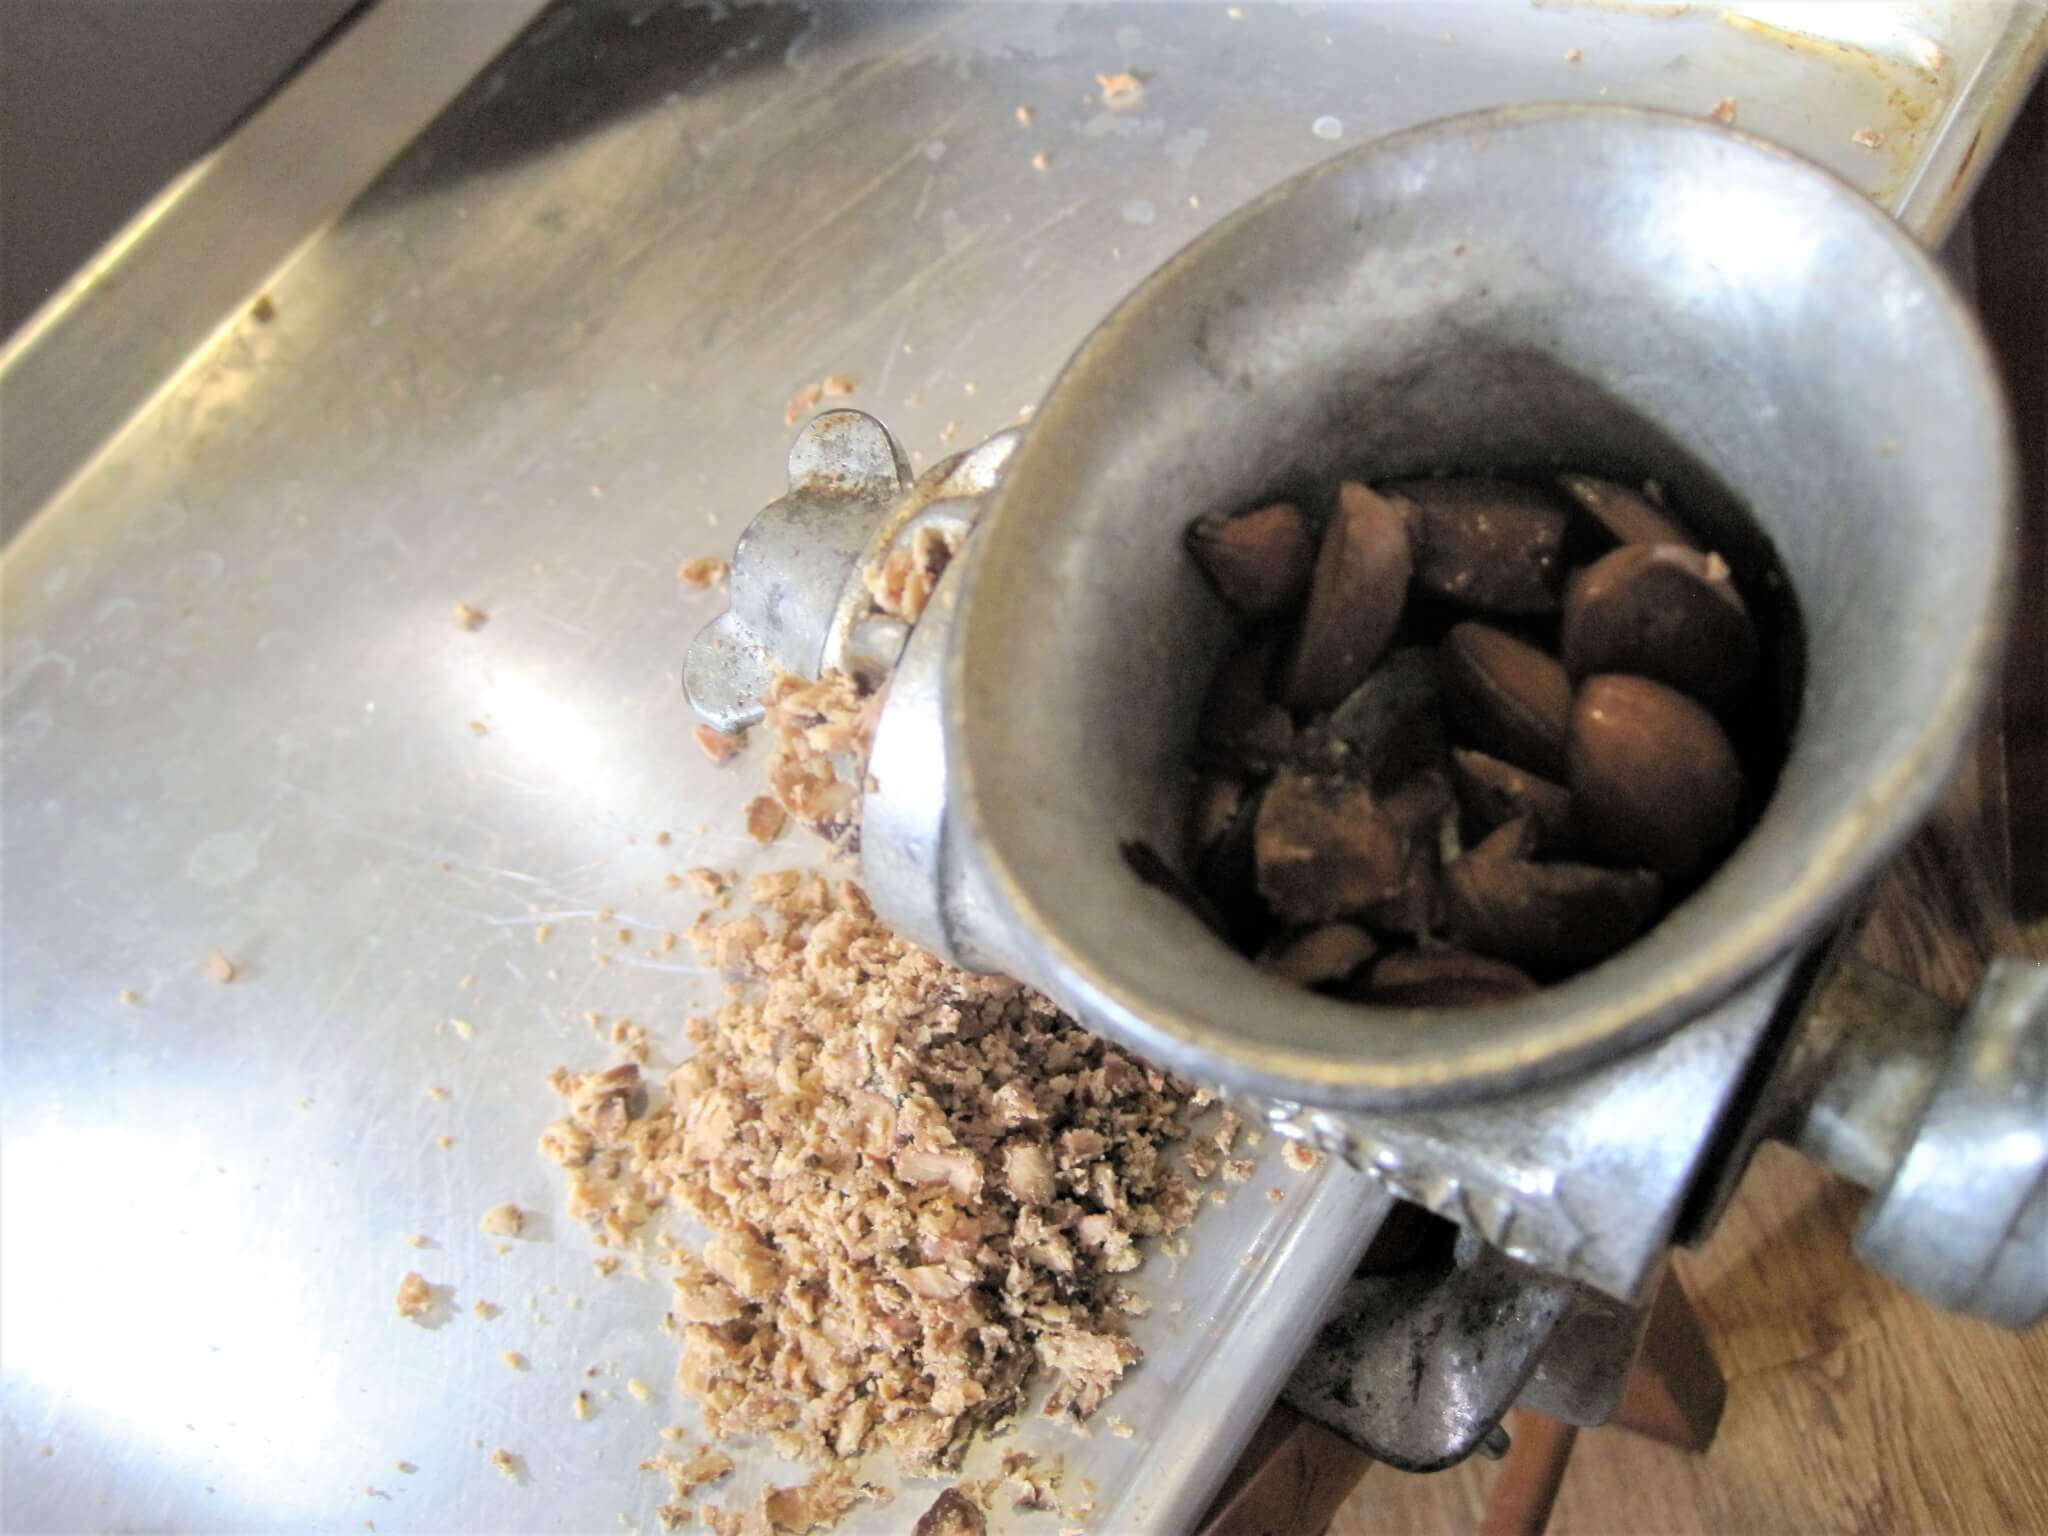
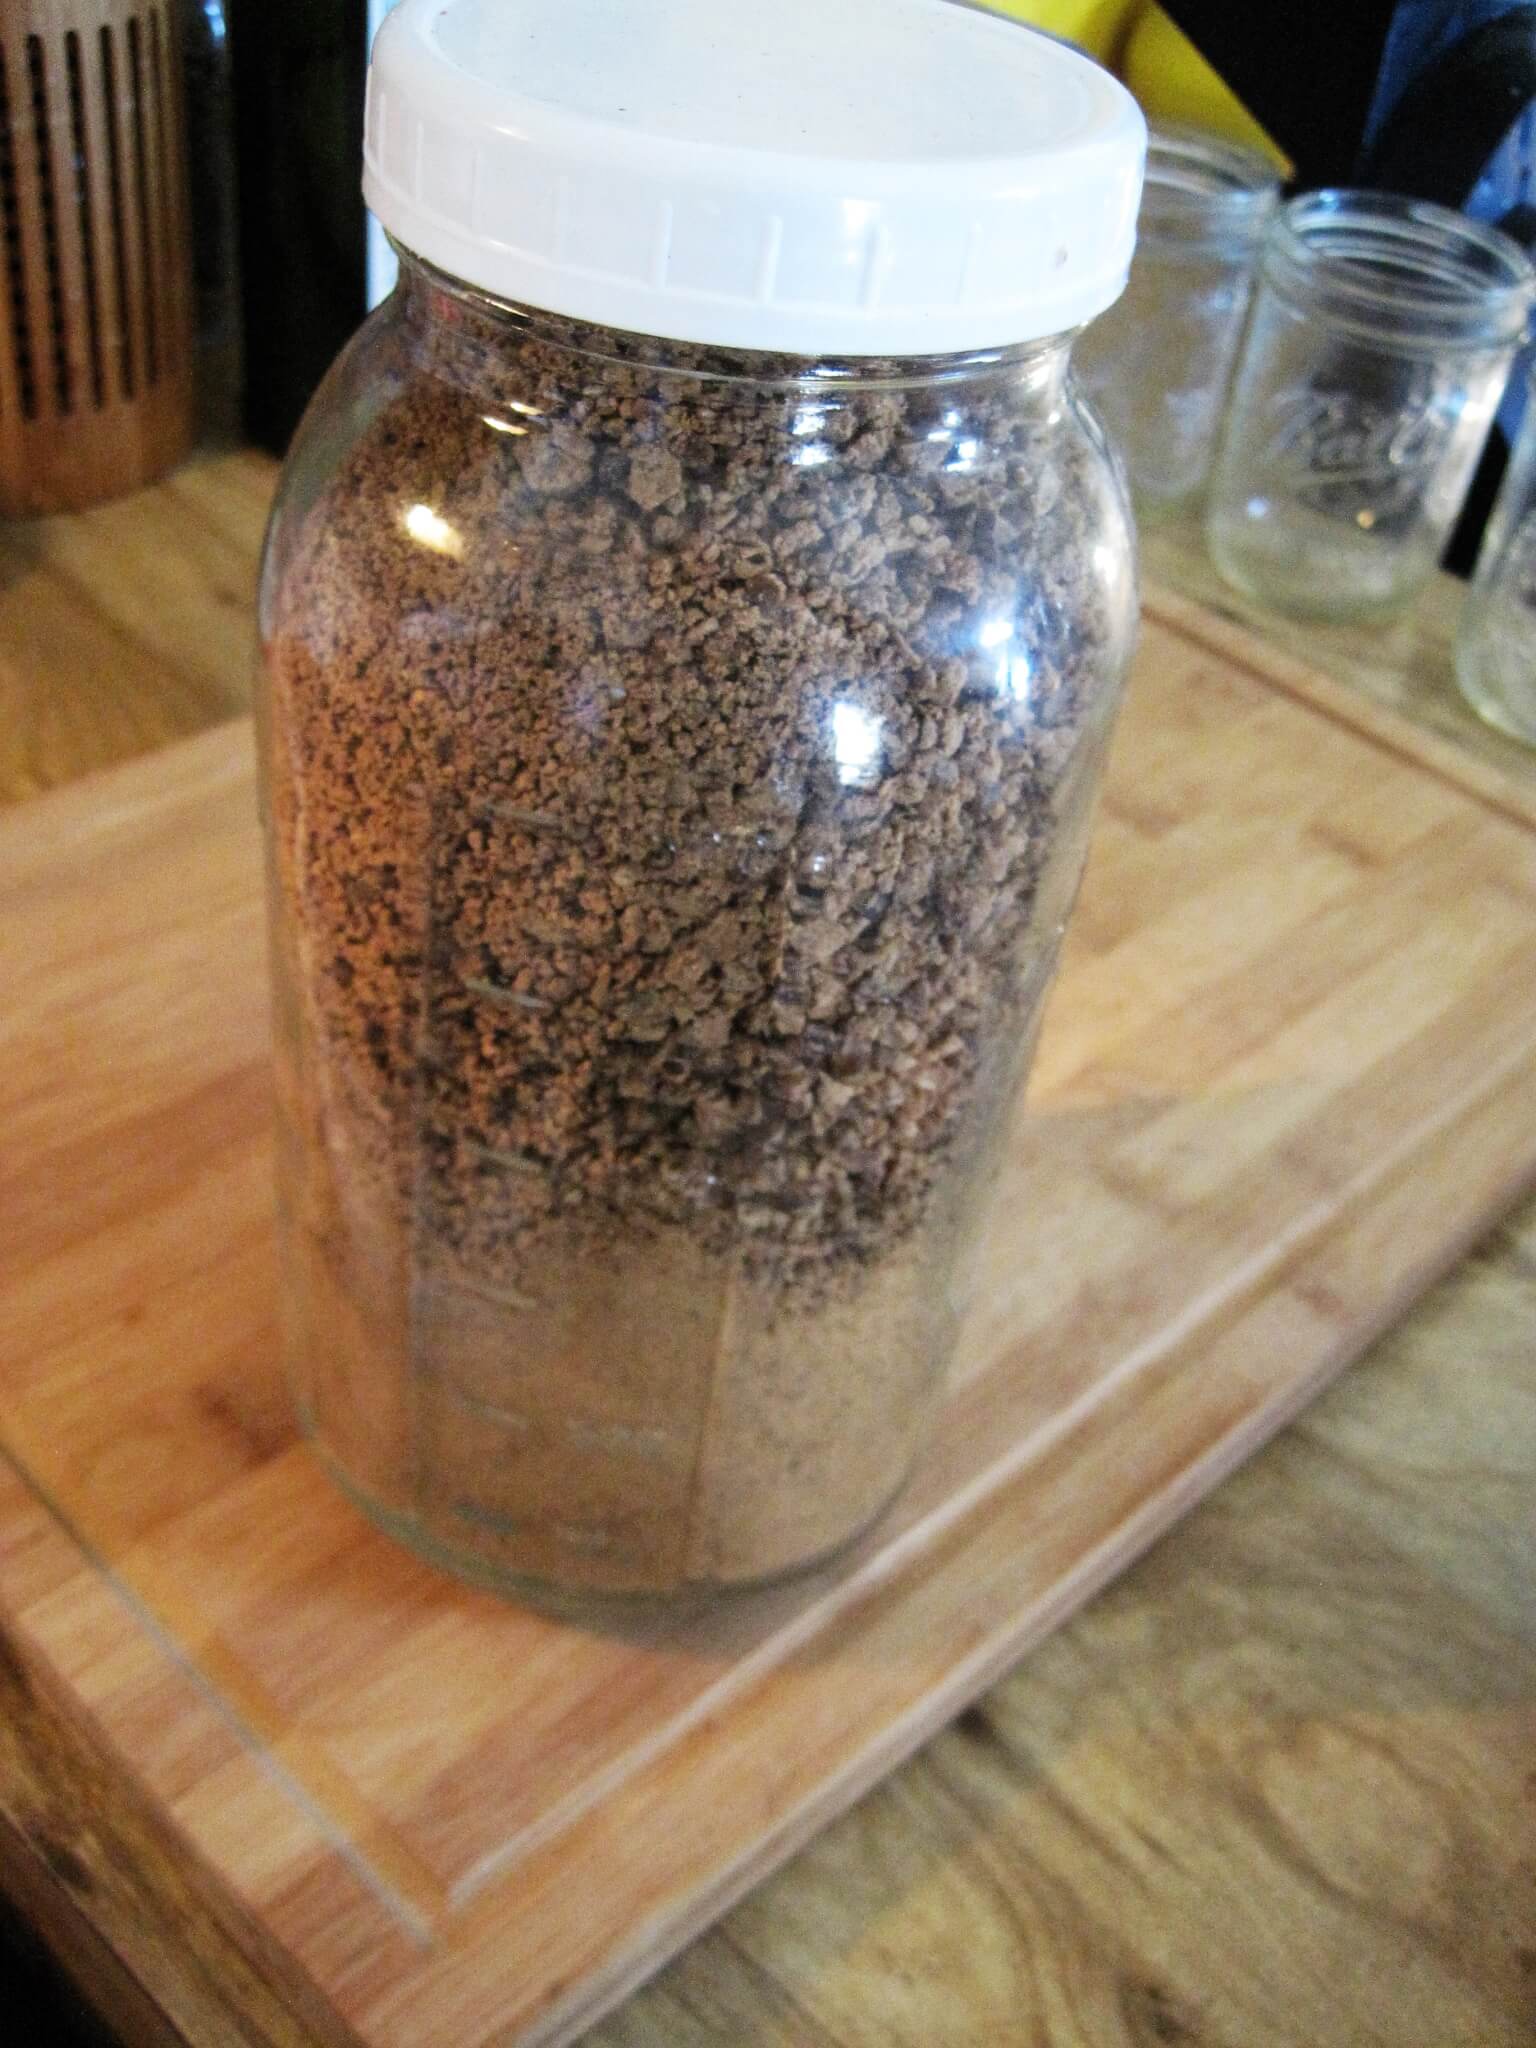
Grinding The Acorns
Now that the acorns are leached, its time to turn them into flour–you’re almost there, hungry forager!
My method is to run the damp, leached acorns through an old-fashioned, hand-crank meat grinder. They’re really easy to find at antique markets and thrift stores–the one pictured here was only $4!
Spread the damp nut meal back on a cookie sheet and allow it to dry completely. If you have a wood stove, place it at the the base and stirred occasionally until it is bone-dry–this will take two days or so.
You can also do this in a dehydrator or in a conventional oven at 170 degrees Fahrenheit until the meal is bone-dry. Don’t rush this part! If you store the flour even slightly wet, it may mold and all your hard work will end up in the compost pile.
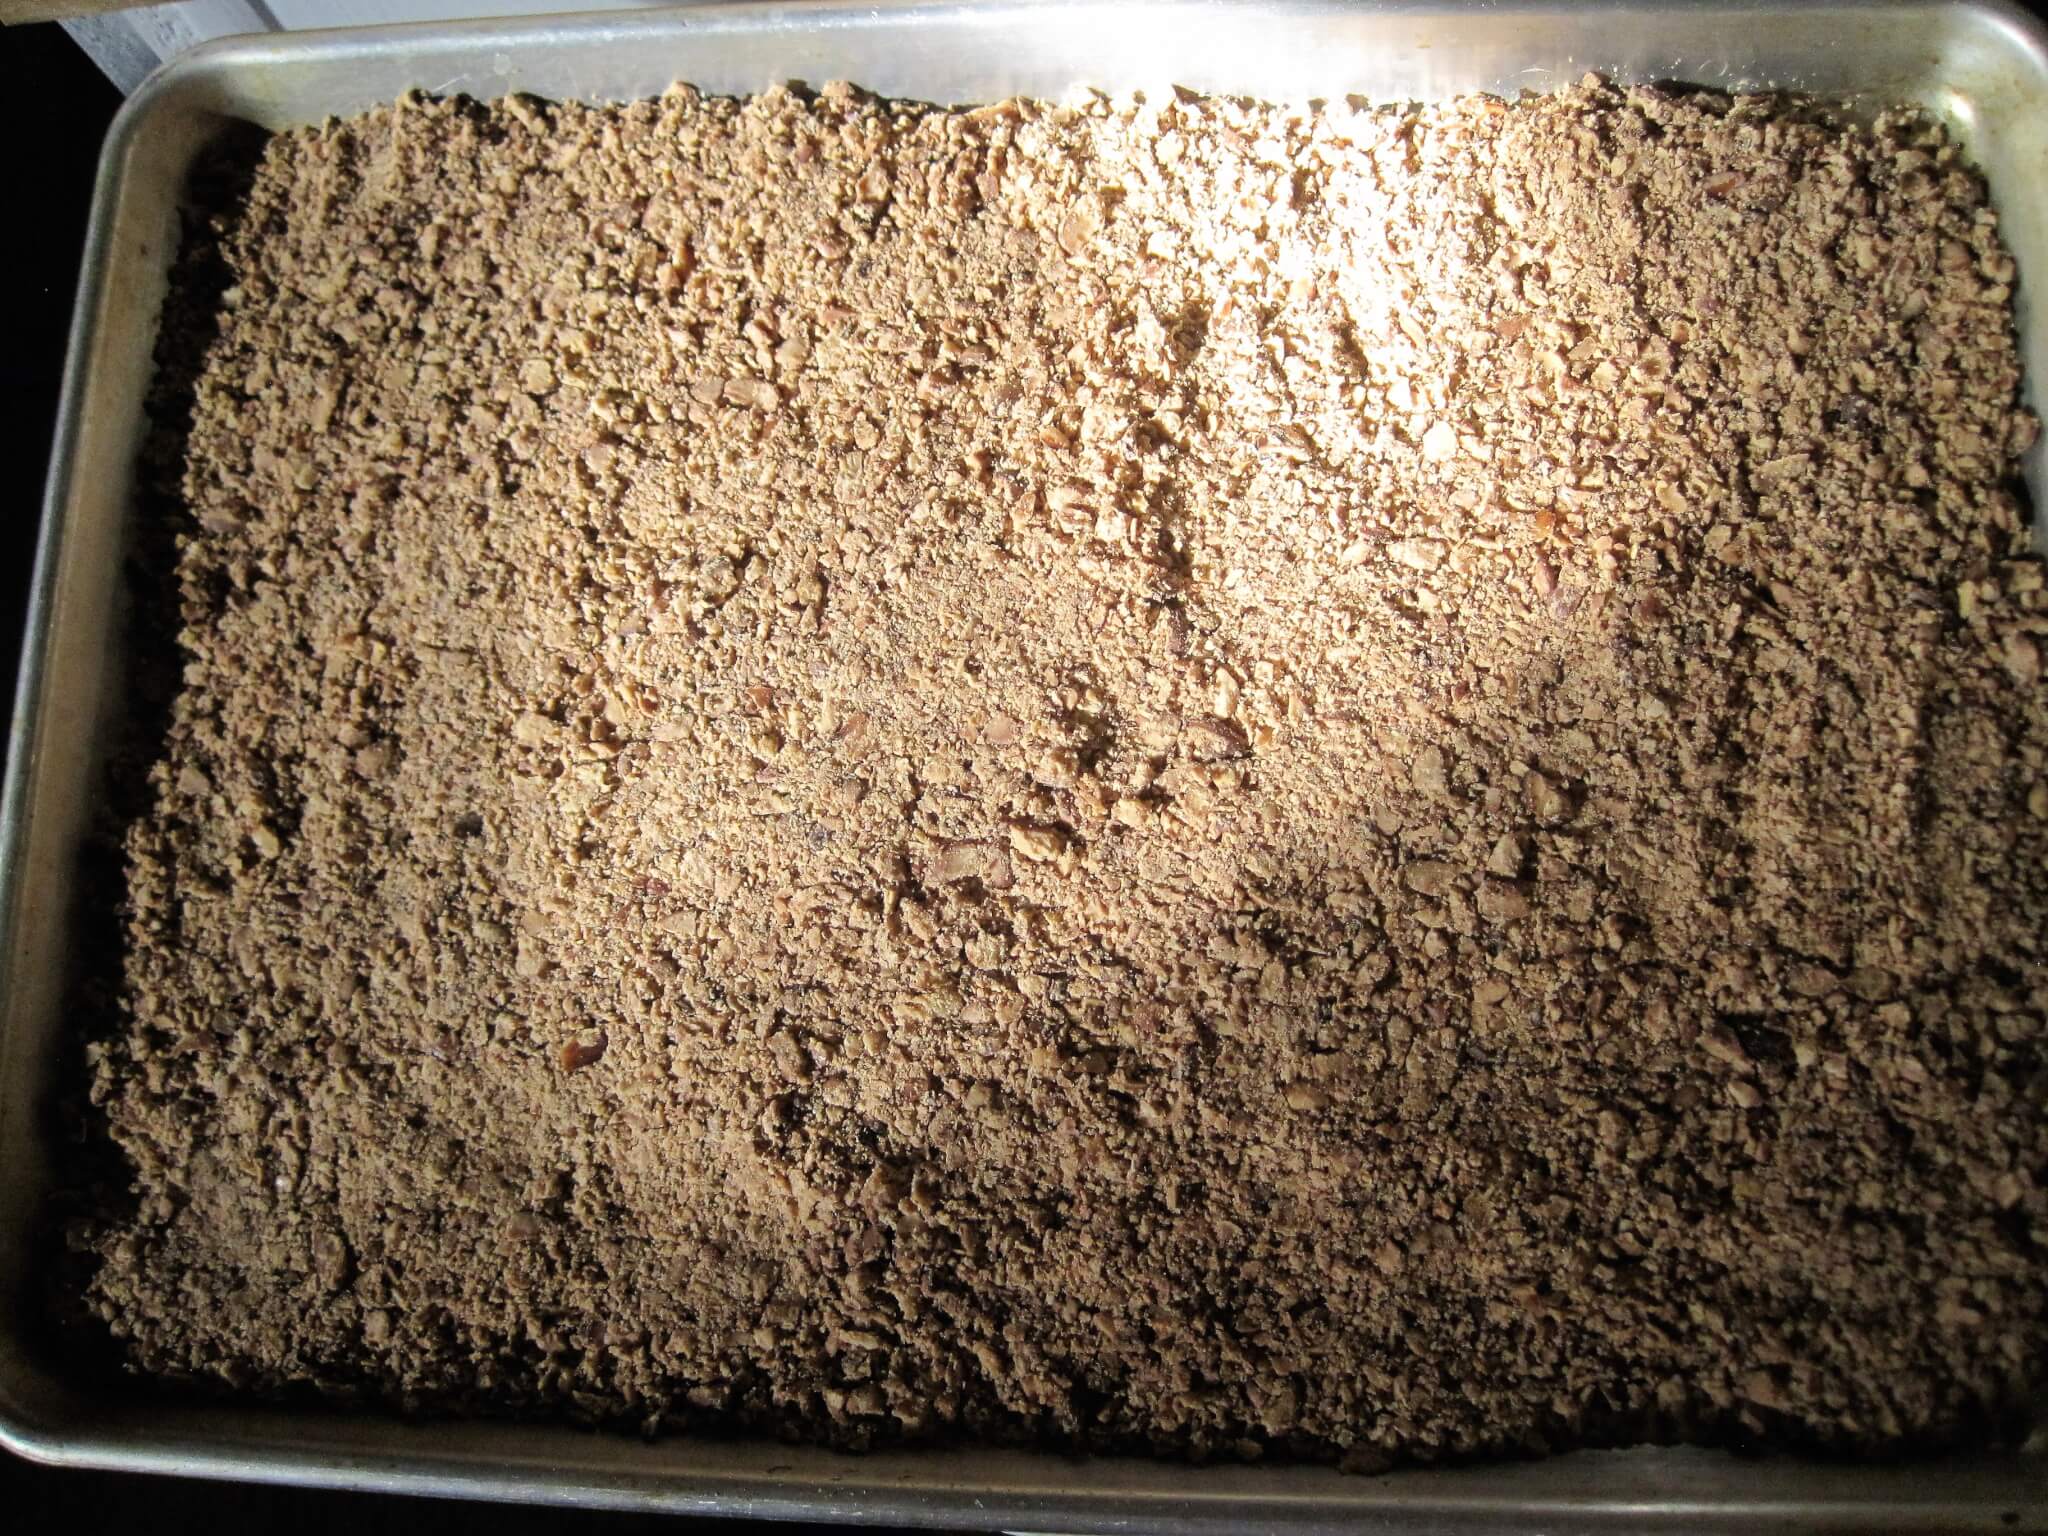
The end result will be a very coarse flour. This can be used as-is, or it can be run through a flour mill or coffee grinder to produce finer flour for baking. Either way, you can now store it in an airtight container and use it at your leisure!
It’s finally ready! By this point, you are undoubtedly hungry, and rightly so. Let’s look into some delicious uses for this food.
Part Three: Cooking with Acorns
As an ingredient, you can think of hot-leached acorn flour in a vaguely similar way to cornmeal. With no gluten to hold it together, it won’t form a springy, bread-like dough on its own, but don’t let that stop you from experimenting with eggs, mixing it with wheat flour or some other starch, or seeing what can be done to let it shine as an ingredient in its own right, rather than just an inclusion.
Taste-wise, acorn flour is nutty, earthy, sweet, and reminiscent of maple or molasses. The hot-leach method results in a dark brown flour that will give a pumpernickel-like color to whatever you mix it in. So with all those factors in mind, let me share some ideas on how to make it into delicious food!
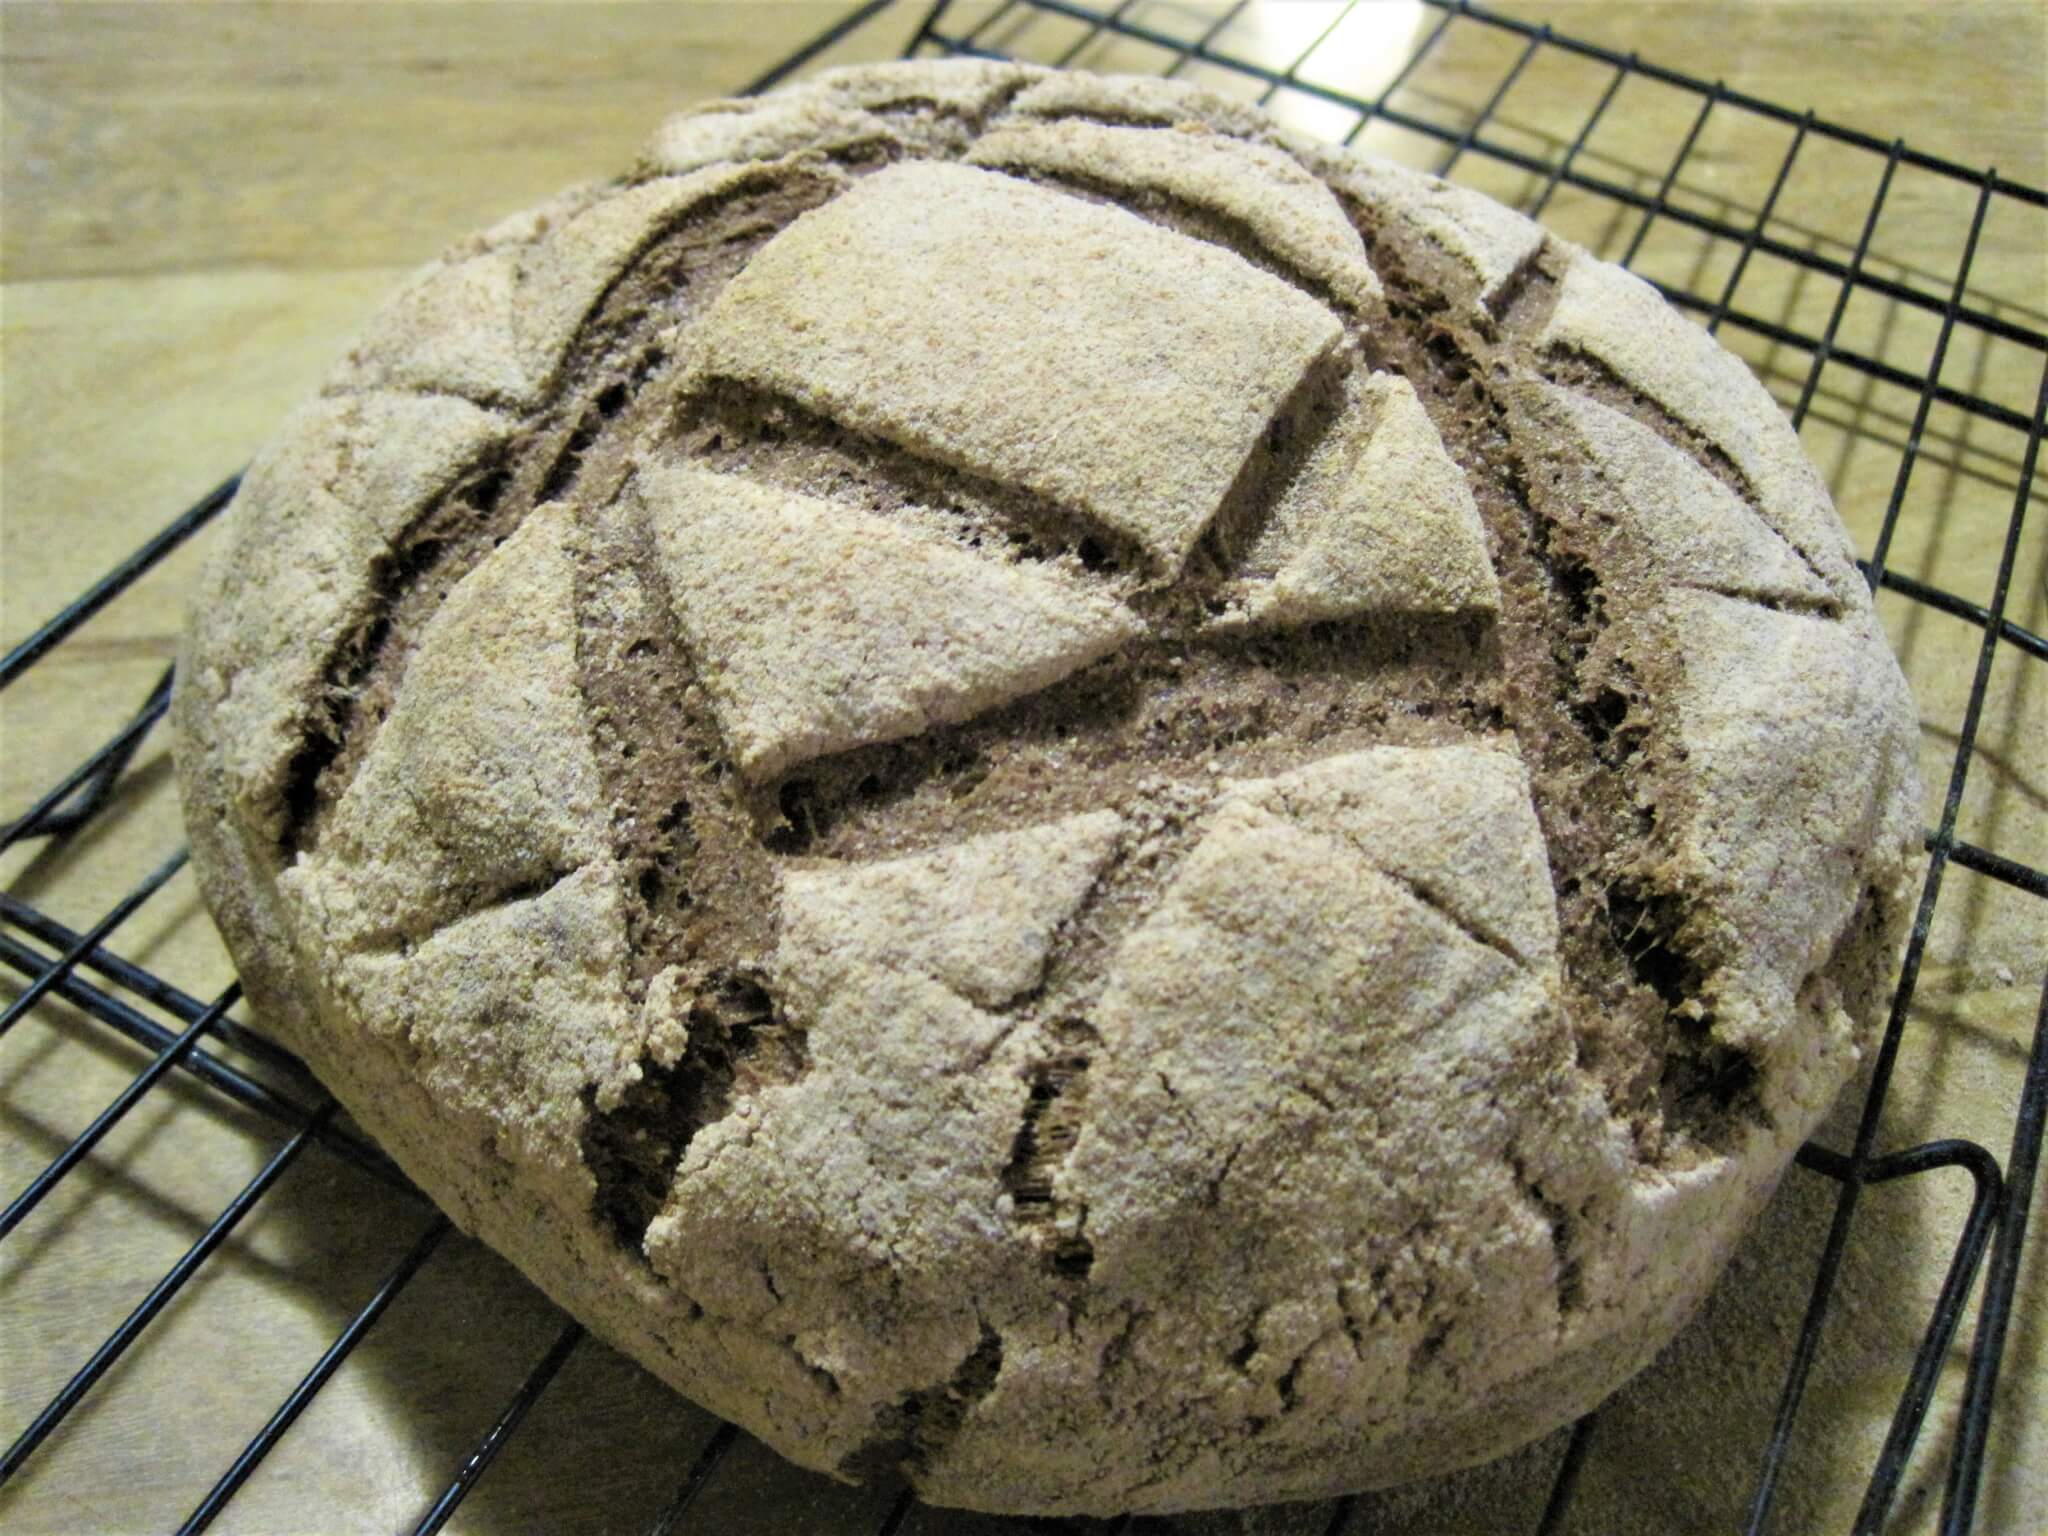
Acorn Sourdough Boule Recipe
Ingredients
- 3/4 cup sourdough starter
- 1 ½ cups warm, filtered water
- 1 teaspoon salt
- 2 cups whole-wheat flour
- 1 cup finely-ground acorn flour
(Note: The amount of flour you need to use varies depending on the day’s humidity. I find that I use far less flour in the summer than I do in the winter.)
Directions
- Add sourdough starter and filtered water to a large bowl. Mix thoroughly with your hand.
- Add salt, then flour, one cup at a time, and continue to mix with your hand. The dough should be wet. If it is dry or hard to work with, add more water.
- Let the dough rest 10 minutes.
- Wet your hands and knead the dough in the bowl. It may seem counter-intuitive, but whole wheat needs to be kneaded with water, not flour. Trust me on this one! Knead the dough in the bowl for 4 minutes, wetting your hands as necessary to keep the dough from sticking. If it is hard to knead at this point, you’ll want to introduce more water, about a teaspoon at a time, until it is workable. It’s okay if it feels slightly “too wet.” It will soak it up, guaranteed.
- Allow to rest another 5 minutes.
- You’ll probably notice that the dough is now smooth, supple, and not as sticky. Form into a round, cover with a towel, and put someplace warm for the next four hours.
- The dough should have risen quite a bit during this time. Punch down, then gently shape into a round ball by pulling the edges into the center.
- Line a large bowl with a linen towel, then dust the dough liberally with flour. Lay the dough in the bowl and put back in the warm place to rise again for at least 2 hours.
- Preheat your oven to 475 degrees Fahrenheit.
- If using a baking sheet, both grease and scatter flour over the surface before gently flipping the bread onto it. If using a pizza stone, dust your pizza peel with flour before turning the bread out onto it.
- With a sharp, serrated knife, score the top of the bread to allow for expansion during baking.
- Slide the bread into the oven and bake for 15 minutes.
- Lower the temperature to 425F° and bake another 20 minutes.
- Your bread is done if the internal temperature has reached 200F°. You can check with a meat thermometer or use the traditional method of tapping the bottom and listening for a hollow sound.
- If you can resist the urge, allow the bread to cool on a wire rack for 15 minutes before slicing so that it can finish internally steaming.
- Serve with butter and a fruit preserve.
- Once cool, wrap in a towel and store in a cool, dark place. It should stay good for about 4 days.
Other Acorn Recipes:
Acorn Porridge by Adam Haritan
Porridge deserves more time in the limelight as a delicious breakfast option. Simmer a cup of coarse acorn flour in two cups of water, or make a 50/50 mix with coarse-ground wheat or other grains for a nourishing start to the day. Add a pinch of salt, a handful of raisins, and a knob of butter to make it something special.
Acorn Pancakes
Served with a side of wild berries and a drizzle of home-tapped maple syrup, you can prove to both yourself and your breakfast guests that wild food is the best food in the world.
Acorn Coffee
Roasted until fragrant and simmered for 15 minutes, coarse-ground acorn flour can be brewed into a rich, coffee-ish drink that is comforting on its own and delectable with some sweetened, spiced milk.
This is just a tiny sampling of all the possibilities that await the home cook with a jar full of acorn flour. This fall, I hope you take the chance to forage, process, and truly enjoy this amazing, free ingredient! And if you have your own recipes for acorns, please don’t hesitate to share them.
One Last Idea
I want to offer one more idea for the homesteader looking to utilize wild food to it’s full potential–it’s a great feed supplement for many of our animals. My ducks, chickens, and goats have all relished eating acorns and acorn grubs in the fall. The ducks and goats can handle them raw and unshelled as they fall from the tree, but the chickens need them smashed before they can get the nutmeats out. I have no experience with feeding them to other livestock, so my knowledge is limited to the effect on cows, sheep, or horses. All the same, acorns offer another self-sufficient option to the homesteader hoping to provide for their animals needs directly from their own land, rather than being entirely dependent on the feed store.
Resources
If you’re interested in the best foraging books in the world, you need to check out the work of Samuel Thayer. His book Nature’s Garden has the most thorough, useful, and insightful write up on acorn foraging that I’ve found anywhere, with far more information and recipes than what I’ve presented here.
Hank Shaw is another name for those interested in foraging to remember. His recipes using acorns are positively amazing-looking.
Another place worth investigating is this excellent post by another homesteader also turning acorns into a diet staple for her own family. Practical Self-Reliance is full of excellent ideas, including acorn pasta and acorn cheese!
For those foragers out there closer to the foodie side of the spectrum, Pascal Baudar is your man. He has been transforming wild foods into super-fancy epicurean delights with a fervor that needs to be seen to be believed. Some of his creations may be more complicated than is practical for everyday fare, but if you’re looking for inspiration, he’s a great source of it.