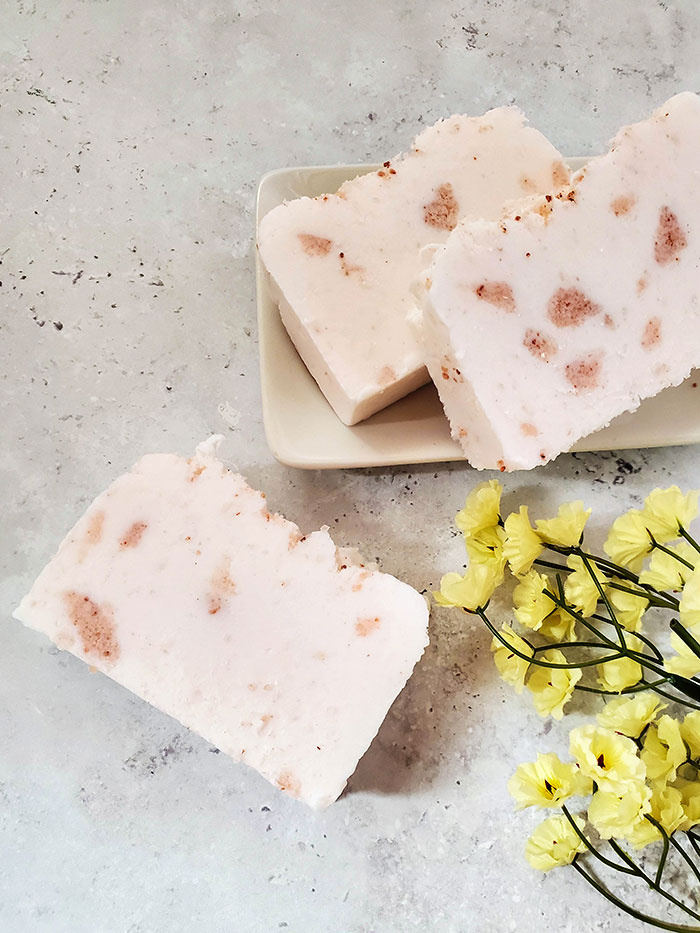
Pink Himalayan Salt Soap Recipe
Learn how to make a pink Himalayan salt soap recipe with melt and pour soap. This is an easy soap recipe that takes about 10 minutes to make and makes four Himalayan salt soap bars. Use this salt scrub soap bar recipe to exfoliate your skin, and it's especially good to use before shaving your legs.

Himalayan Salt Melt and Pour Soap Recipe
In the summer, I like to use an exfoliating soap to keep my skin looking smooth and soft. This pink salt soap bar is easy to make with melt and pour soap, and there are several Himalayan salt soap benefits for your skin.
Cold process soap is more forgiving for adding salt, but you can still make salt soap melt and pour by using the right type of salt and with a few tricks.
One thing to note is that a Himalayan salt melt and pour soap recipe will be more abrasive than a cold process salt soap recipe.
For this reason, I suggest using pink HImalayan salt soap on your body and not on your face. It's a great soap to use before shaving because it exfoliates your skin for a closer shave.
For more easy melt and pour soap recipes, check out these posts:
- How to Make Calamine Soap
- Homemade Turmeric Soap Recipe
- How to Make Melt and Pour Soap With Embeds
- Tips for Layering Melt and Pour Soap
- Rose Clay Melt and Pour Soap Recipe
- Melt and Pour Unicorn Soap
- Honey Soap Recipe
- Calendula Soap Recipe for Dry Skin
Can You Put Salt in Melt and Pour Soap for Salt Soap Recipe?
Making a salt soap recipe with melt and pour can be tricky because the salt makes the soap base get hard quickly. For best results, use pink Himalayan salt or a fine grain sea salt.
Dead sea salt and Epsom salt don't yield good results and can make a very soft bar of soap.
The soap will set up quickly. You can see below how thick my the soap base is when I poured it into the mold.
You can also use a rectangle soap mold for a single bar and add the salt to the bottom of the mold and pour the soap over it. Then stir in the mold.
Does Salt Dissolve in Soap?
The reason I recommend making a pink Himalayan salt soap is because the salt doesn't dissolve in the soap base. Epsom salt and dead sea salt can melt, which makes the salt scrub bar soap soft.
You'll also lose the salt soap benefits because the soap won't be exfoliating since the salt melts into the base.
Is Himalayan Salt Soap Good for Skin?
There are several Himalayan salt soap benefits, including:
- Pink himalayan salt cleanses the skin and draws out impurities from the skin.
- It can boost moisture in the skin, which makes the skin softer and increases elasticity.
- Himalayan salt has magnesium, which can be absorbed through the skin.
- Salt is naturally antimicrobial, so it can help promote better skin if you have acne, psoriasis, or eczema.
- The minerals in the salt may reduce symptoms of eczema or psoriasis by reducing inflammation.
- Using a pink Himalayan salt soap can help soothe bug bites and minor skin irritations.
- The salt doesn't completely dissolve, so it creates an exfoliating salt scrub soap bar recipe. Use it instead of a sugar scrub to exfoliate dead skin for smoother and softer skin.
With all of these Himalayan salt soap benefits, you can see why I make a salt soap recipe in the summer!
Does Salt Soap Melt and Pour Dry Out Skin?
Many people don't want to try a Himalayan salt soap bar because they fear the salt will dry out your skin. However, salt is hydrophilic.
This means that it attracts moisture in the air and brings it to your skin. The glycerin in melt and pour soap is also a humectant, which means that it helps moisturize the skin.
There are several Himalayan salt soap benefits, so don't worry about it drying your skin.

How Do You Make Exfoliating Bar Soap?
This pink salt soap bar is exfoliating, so it sloughs off dead skin cells. A Himalayan salt soap bar recipe is a little tricky to make because the soap base hardens quickly.
For that reason, it's a good idea to make other kinds of exfoliating soaps first and then try this pink Himalayan salt soap recipe. Here are more advanced melt and pour soap techniques to try.
If you don't want to make salt soap melt and pour, try one of these exfoliating soap recipes:
- Exfoliating orange slice soap
- Succulent melt and pour soap with coffee
- Pumice scrub soap recipe
- Solid sugar scrub soap recipe
- How to make loofah soap at home
- Exfoliating soap with almonds
Learn about using melt and pour additives.
How Do You Use Pink Himalayan Salt Soap?
Since this is a Himalayan salt melt and pour soap recipe, the salt is more abrasive than a cold process recipe. I recommend using this pink salt soap bar on your body and not on your face.
You can use it in place of your regular soap on your body. If it's too abrasive for you, you can use it on rough skin like your feet, knees, and elbows.
I like to us a Himalayan salt soap bar before shaving to exfoliate.
How Long Does Salt Soap Melt and Pour Take to Cure?
Your Himalayan salt melt and pour recipe is ready to use as soon as it is cooled. Melt and pour soap doesn't need to cure like cold process does.
What is the Shelf Life of Pink Himalayan Salt Soap?
This pink Himalayan salt soap recipe will last about 1 to 2 years after it's made. If you don't plan on using it right away, wrap it in plastic wrap and store away from heat or moisture.
Melt and pour soap does get soggy if it stays wet, so I recommend letting it dry completely between uses. I like to use this metal soap dish so it can drain properly.

Pink Himalayan Salt Soap Tips
Here are some tips for making a salt scrub soap bar recipe:
- I recommend using pink Himalayan salt or fine grain sea salt. Epsom salt and dead sea salt can dissolve, which can cause a soft bar of soap.
- The salt will thicken the melt and pour soap base. You'll need to work quick, so have your mold ready.
- I like to let the soap base cool slightly so the salt stays suspended in the soap.
- You can also place the soap in the bottom of a mold and pour soap on top and stir in the mold. This works better in a mold that makes one bar at a time and not a loaf mold.
- I used a finely ground pink salt in the soap and a coarser ground salt on the top. You can use a fine salt on the top if you wish.
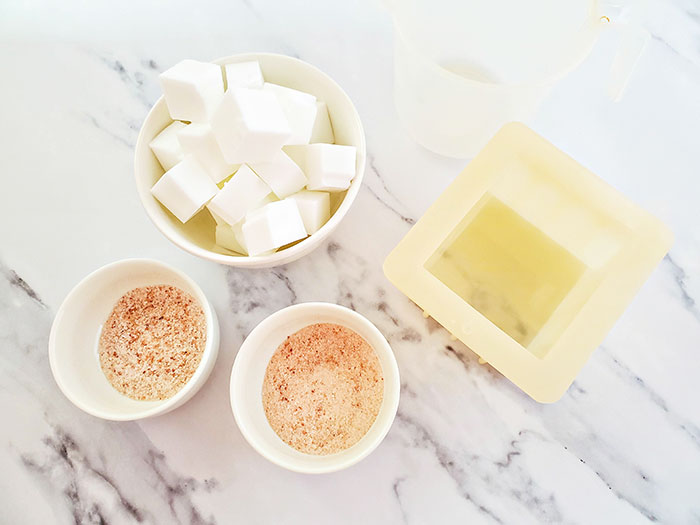
Himalayan Salt Soap Bar Recipe Ingredients
You will need the following to make a pink salt soap bar (makes 4 inch bars):
- 1 1/4 pound white melt and pour soap base
- 2 tablespoons fine Himalayan pink salt
- 1 tablespoon coarsely ground Himalayan pink salt (I ground it from a grinder)
- 4 inch silicone loaf mold
- Microwave safe spouted measuring cup
- Spoon or wood craft stick to stir
- Knife or soap cutter
How Do You Make Pink Himalayan Salt Soap?
Step #1
Grind 1 tablespoon of pink salt from the grinder and place in a small bowl. This will be for the top of the salt scrub soap bar recipe.
Step #2
Cut the soap base into 1 inch cubes and place them in the measuring cup. Microwave on high in 30 second intervals until melted, stir at each interval. Remove from the microwave and allow to cool for 2 minutes.

Step #3
Add the fine salt and stir well. Keep stirring until it starts to cool off and thickens. Let the soap cool until it gets thick as in the photos. The prevents the salt from dissolving and keeps the salt suspended in the soap base.

Step #4
Sprinkle finely ground salt on the top of the soap before it sets up.

Step #5
Let the soap cool in the mold for about four hours or until completely set up and firm. Cut into 1 inch bars.

I hope you enjoy this Himalayan salt melt and pour soap recipe!
Like this post? Pin it!
.jpg)
Pink Himalayan Salt Soap Recipe
materials:
- 1 1/4 pound white melt and pour soap base
- 2 tablespoons fine Himalayan pink salt
- 1 tablespoon coarsely ground Himalayan pink salt (I ground it from a grinder)
tools:
- 4 inch silicone loaf mold
- Microwave safe spouted measuring cup
- Spoon or wood craft stick to stir
- Knife or soap cutter
steps:
- Grind 1 tablespoon of pink salt from the grinder and place in a small bowl. This will be for the top of the salt scrub soap bar recipe.
- Cut the soap base into 1 inch cubes and place them in the measuring cup. Microwave on high in 30 second intervals until melted, stir at each interval. Remove from the microwave and allow to cool for 2 minutes.
- Add the fine salt and stir well. Keep stirring until it starts to cool off and thickens. Let the soap cool until it gets thick as in the photos. The prevents the salt from dissolving and keeps the salt suspended in the soap base.
- Sprinkle finely ground salt on the top of the soap before it sets up.
- Let the soap cool in the mold for about four hours or until completely set up and firm. Cut into 1 inch bars.