How to Make an Easy Paper Plate Snowman
A classic winter craft for kids that's certain to brighten up a gloomy day.
If you live on the East Coast, it's likely you've seen some snow already, same for our friends out in the Rockies. There's something magical about a snow day and the playing outside in a winter wonderland. This craft is inspired by the simply joy of making a snowman. Whether you are in Florida or Minnesota, we want to share how to make this easy paper plate snowman. It's a classic craft that's certain to brighten up your winter.
Related: Related: How to make your own dinosaur egg
Getting Inspired
To help on this project, we enlisted master crafter Karimah Henry from the site craftingafunlife.com. I love that this project is simple to assemble and let's kids show off personal flair.
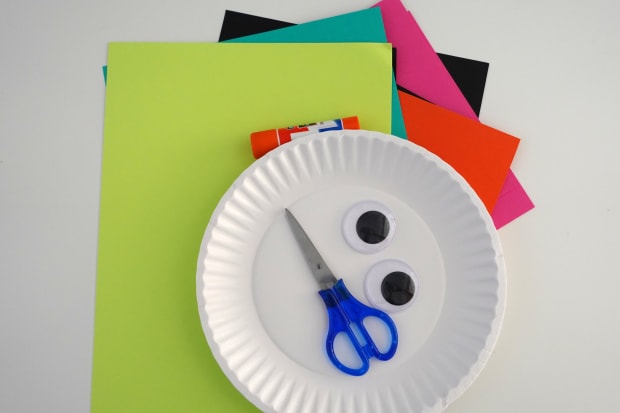
Paper Plate Snowman Supplies
- Paper plates (2)
- Cardstock (black: mouth, orange: nose, black glitter: buttons, pink: cheeks and any other color for the scarf)
- Jumbo wiggle eyes- 2 (1.57 in)
- Glue stick
- Scissors
Paper Plate Snowman Directions
- First, cut out the snowman’s head from one of the paper plates. Make sure to cut just outside the smallest center circle of the plate.
- Next, glue two jumbo wiggle eyes to the middle of the paper plate.
- Cut two small circles from the pink cardstock to create the cheeks. Glue the pink cheeks on the paper plate, one on each side.
- Now cut five tiny circles from black cardstock to create the mouth. Create a smile using the small circles then glue on the plate below the pink cheeks.
- Cut a small triangle from orange cardstock to create the carrot nose. Glue the snowman’s carrot nose in the middle of the two cheeks.
- Create the hat by cutting a square and rectangle from black cardstock. Assemble the snowman’s hat by gluing the rim (rectangle) to the bottom of the main hat piece (square). Now glue the hat to the snowman’s head.
- Cut out a long piece and two small pieces out of any color cardstock to create the scarf. Then glue the pieces to the second paper plate (body of the snowman).
- Create buttons by cutting two circles from black glitter cardstock. Glue to the middle of the second paper plate below the scarf.
- Finally, glue the paper plates together to form your adorable snowman.
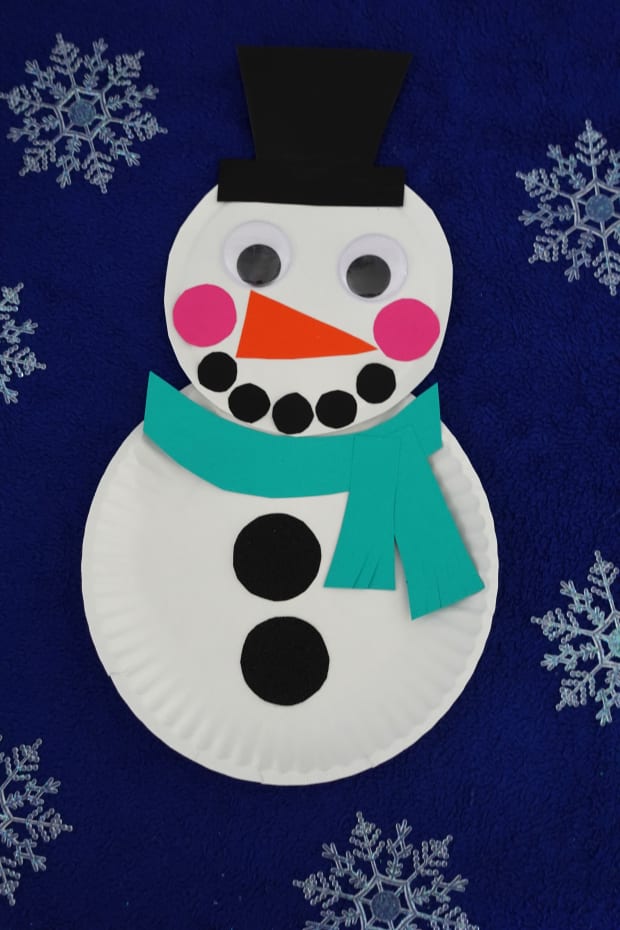
This happy little guy can be personalized in many ways. Update his outfit, give him stick arms, add a bowtie, be sure to make him you own and then put him in a window to keep an eye out for snowflakes!
MORE KID-CENTRIC IDEAS FROM MOMTRENDS
- Giant crepe paper spring flowers
- Watermelon paper plate craft for kids
- Make a Midsommar floral wreath craft
PIN IT!
Use Pinterest to save your favorite family travel destinations to help inspire your next trip. Be sure to follow our Activities to Do with Kids here.
This is not a sponsored post.